Overview
Welcome to Windows 11!
Windows 11 maintains and updates existing Windows functionality, while incorporating a new interface and streamlined features to make your agency work easier.
This guide provides basic information about using Windows 11 in the agency's IT environment, such as how to log into the network using your PIV card, as well as some quick tips about the system’s new features.
Contents
For information about the basics of your Windows 11 system, see the following sections:
- Using your PIV card for authentication
- Connecting to the network and logging in with Windows 11 on-site
- Connecting to the network and logging in with Windows 11 from a remote location
- Logging off and shutting down
- Adding and removing network printers with Windows 11
- Some new Windows 11 features
- Changing your LAN password from Windows 11
- Setting default applications in Windows 11
- Preventing a laptop from entering sleep mode when it is closed
- Wrapping up
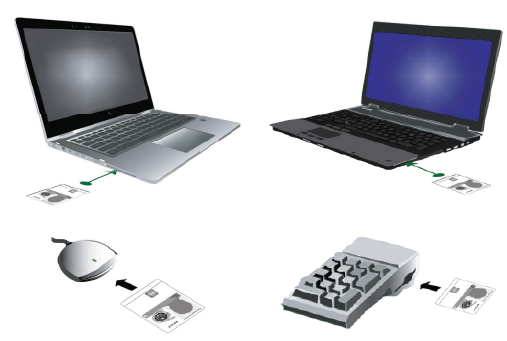
Using your PIV card for authentication
To log into both the agency network and Windows 11, you must use your PIV card to verify your identity and access rights. To do so, you must know how to insert your PIV card, when instructed, into a card reader installed in or attached to your system. Choose one of the following options:
- If you have an agency-issued laptop computer, use the PIV card reader that is built into it. Depending on your model, the PIV card slot may be on either the left or the right side of your laptop.
- If you have an agency-issued desktop computer, use a PIV card reader connected to it, such as a USB reader or a keyboard reader.
Connecting to the network and logging in with Windows 11 on-site
If you are logging into your system on-site at your agency, and it is connected by cable to the agency Local Area Network (LAN), you can log directly into Windows on it. To do so, perform the following steps:
- Ensure that your computer is completely shut down. Then, insert your PIV card into your system’s card reader. For information, see the “Using Your PIV Card for Authentication” section.
- Turn your computer on.
- At the Windows opening screen, press the CTRL-ALT-DELETE key combination to continue.
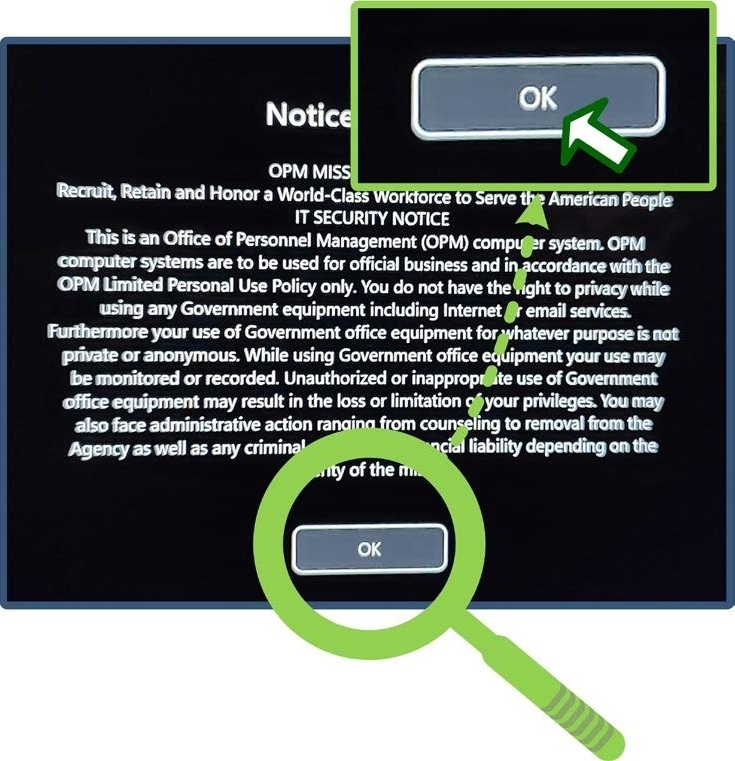
At the agency “Notice to Users,” click the OK button.

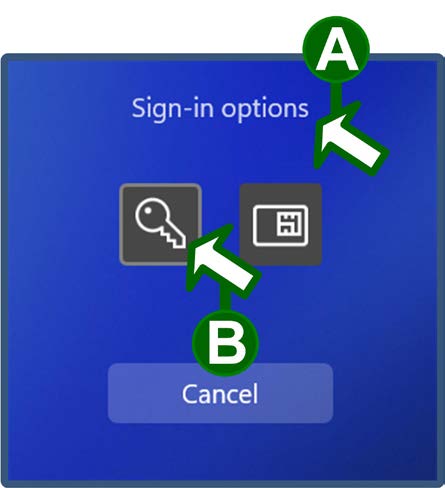
At the “Other user” screen, click the Sign-in options link.
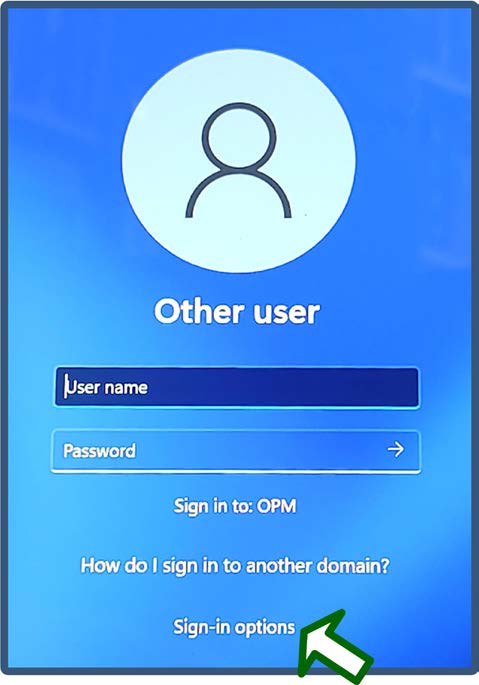
If necessary, select the Smart card icon that accesses your federal identification number when you click it.

📝 Note: Do not select the Smart card icon that accesses your LAN username when you click it, if one is present.
- Wait while the system reads your PIV card.
At the “Smart card sign-in” prompt, type your PIV PIN in the “PIN” field, and then either click the arrow button or press the ENTER key.
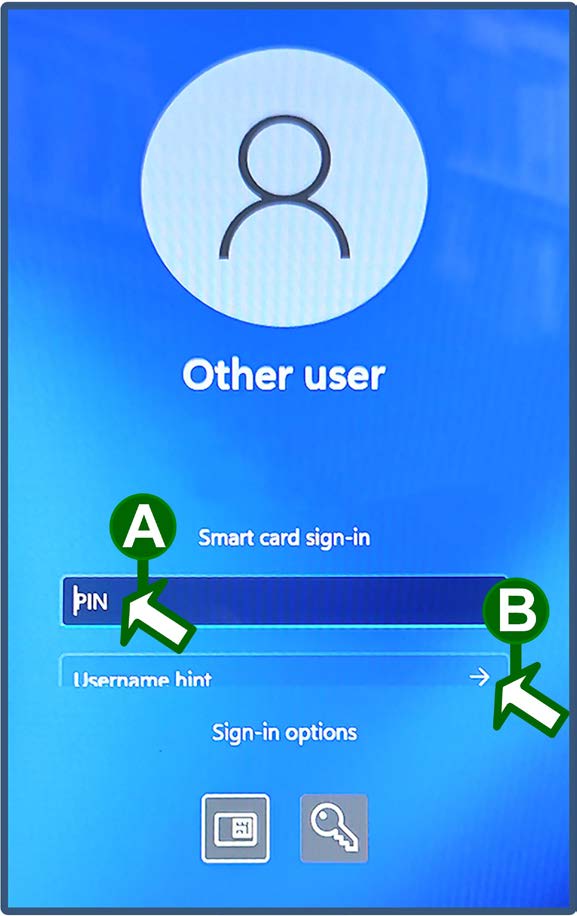
📝 Note: Leave the “Username hint” field blank.
- Wait while the system completes the Windows login process and presents the Windows desktop screen.
Connecting to the network and logging in with Windows 11 from a remote location
If you are logging in from a remote location, and you need to access the agency’s network resources, you must log into the agency's Virtual Private Network (VPN) as well as Windows 11. To do so, perform the following steps:
- Ensure that your computer is completely shut down. Then, insert your PIV card into your system’s card reader. For information, see the “Using Your PIV Card for Authentication” section.
- Turn your computer on.
- At the Windows opening screen, press the CTRL-ALT-DELETE key combination to continue.
At the agency “Notice to Users,” click the OK button.
- If you need to connect your computer to wireless to access the Internet, do so by clicking the wireless network button in the lower-right corner of the Windows 11 system tray and following the connection prompts.
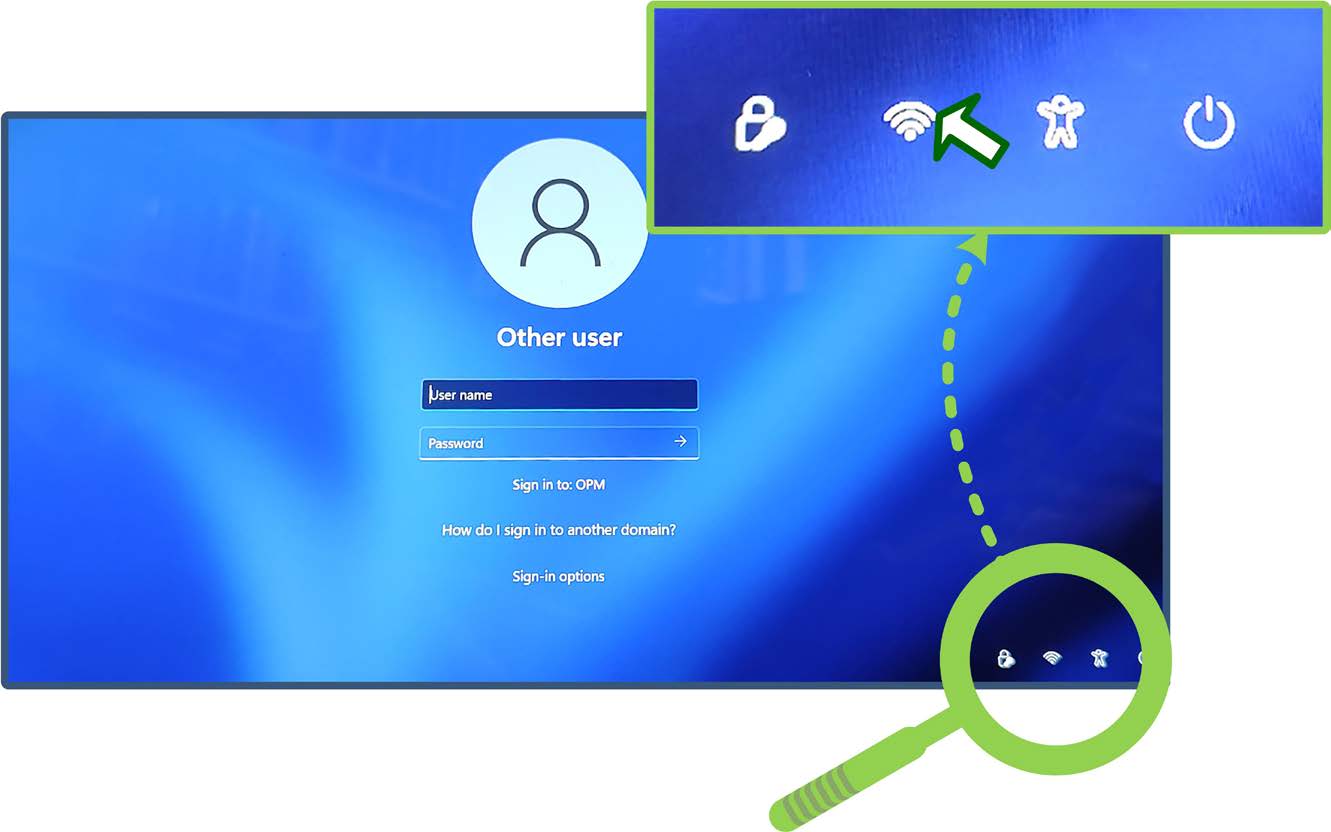
📝 Note: You must connect your computer to the Internet in order to access the agency's network.
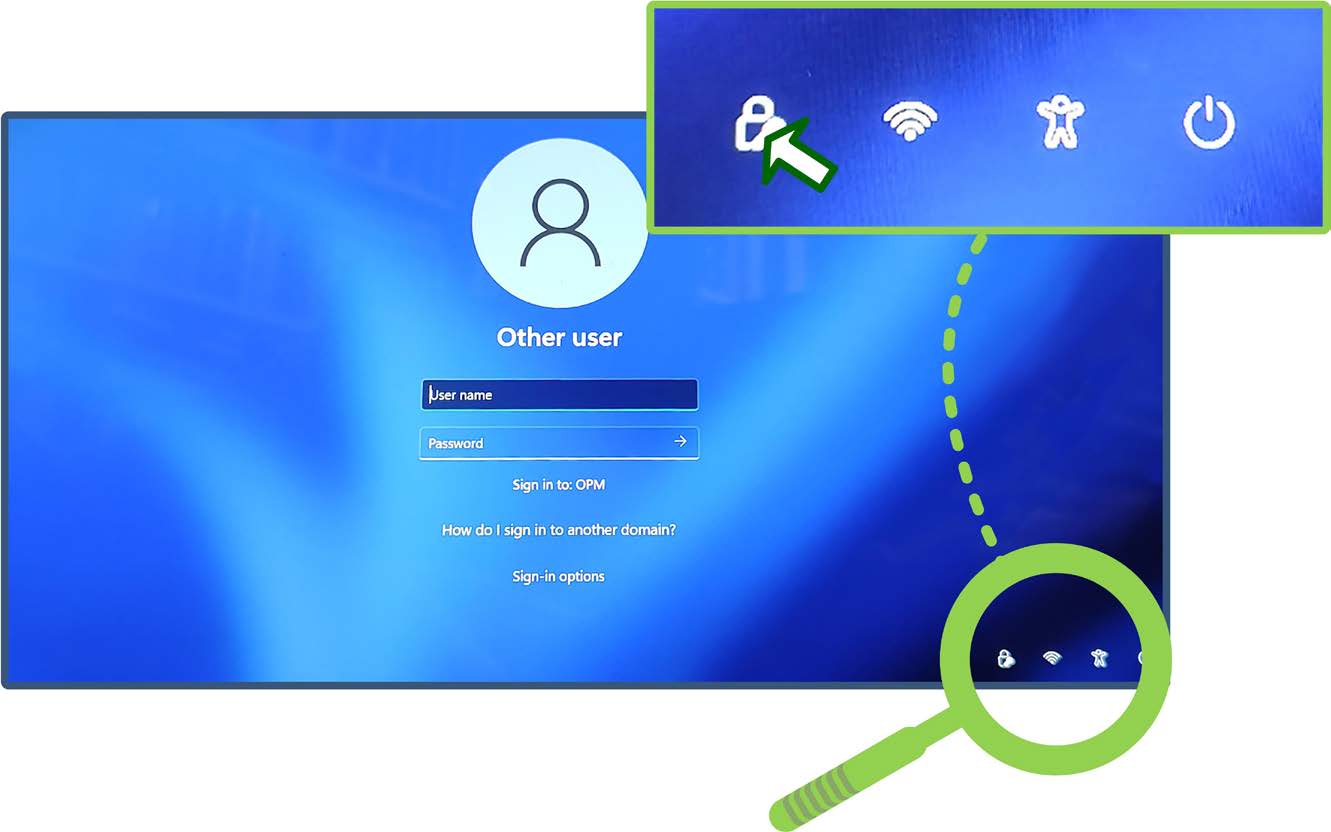
- After your system connects to the Internet, click the Network sign-in button in the lower-right corner of the system tray.
📝 Note: If the system does not present the “VPN: Ready to connect” prompt in the next step, choose one of the following options:
- To continue attempting to sign into the network, click the Cancel button, wait a few seconds, and click the Network sign-in button again. To ensure that you have full access to resources or if you have been instructed to perform a software upgrade, you should log into the VPN before you log into Windows.
To skip the network sign-in and log directly into Windows, click the Cancel button and go to Step 11.
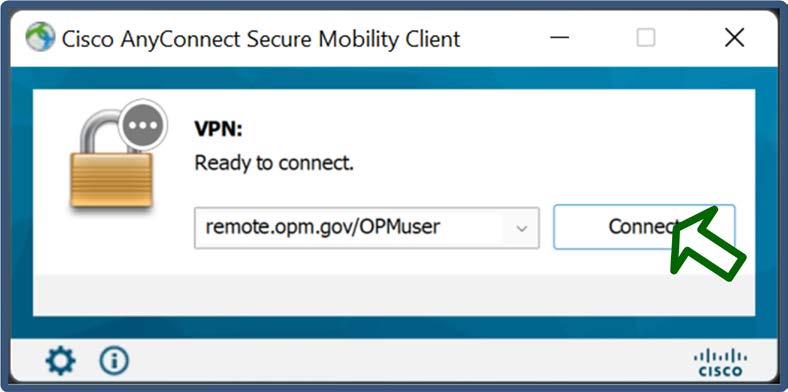
At the “VPN: Ready to connect” prompt, click the Connect button, if necessary.
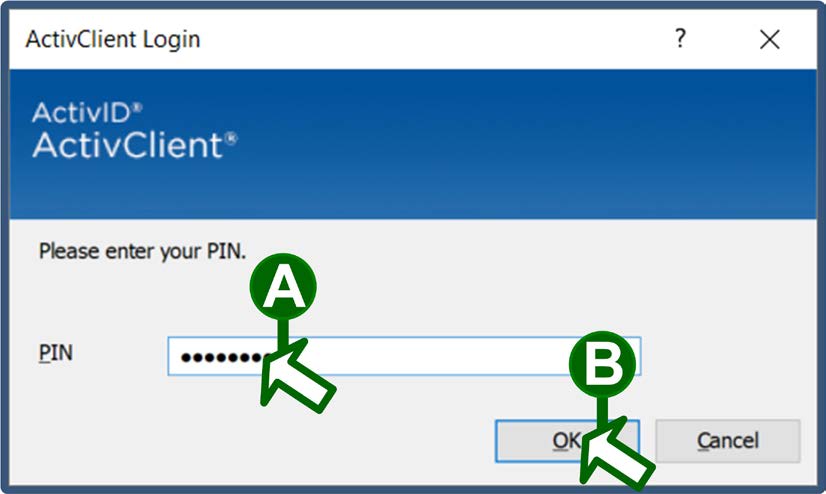
At the “Please enter your PIN” prompt, type your PIV PIN in the “PIN” field and click the OK button.
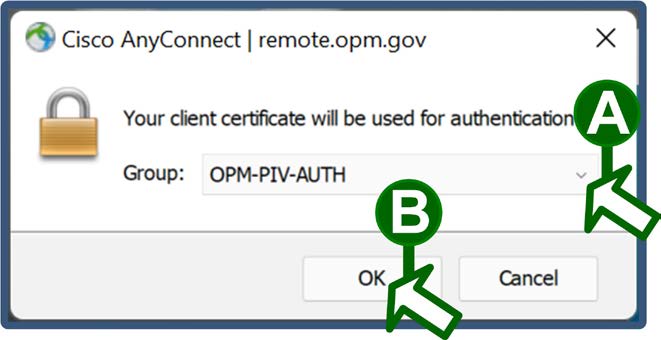
At the “Your client certificate will be used for authentication” prompt, ensure that the "Group" drop-down field is set to the PIV-AUTH option and click the OK button.
- Wait while the system completes the VPN login process.
📝 Note: If the system does not present the “Other user” screen with the Sign-in options button that is listed in the next step, click the Cancel button to access it.
At the “Other user” screen, click the Sign-in options link.

If necessary, select the Smart card icon that accesses your federal identification number when you click it.

📝 Note: Do not select the Smart card icon that accesses your LAN username when you click it, if one is present.
- Wait while the system reads your PIV card.
At the “Smart card sign-in” prompt, type your PIV PIN in the “PIN” field, and then either click the arrow button or press the ENTER key.

📝 Note: Leave the “Username hint” field blank.
- Wait while the system completes the Windows login process and presents the Windows desktop screen.
📝 Note: If you did not log into the VPN, Windows 11 will prompt you to do so now. To respond to the prompts, use the information in Steps 7 and 8.
Logging off and shutting down
When you are done working, save and close all applications. Then, turn off your laptop. To do so, click the Windows "start" button at the bottom of your desktop screen, click the Power icon at the lower-right corner of the "start" menu, and select the Shut down option from the resulting menu.

Adding and removing network printers with Windows 11
The agency maintains network printers that you can access with your system, as long as you have the necessary permissions. To use a printer, you must add it to your system. When a printer is no longer available, you should remove it from your system.
📝 Note: When the agency upgrades its network printers, you may have to add the new printer listings and delete the old ones.
For information on adding and removing printers, see the following sections:
Adding a network printer
To add a network printer, perform the following steps:
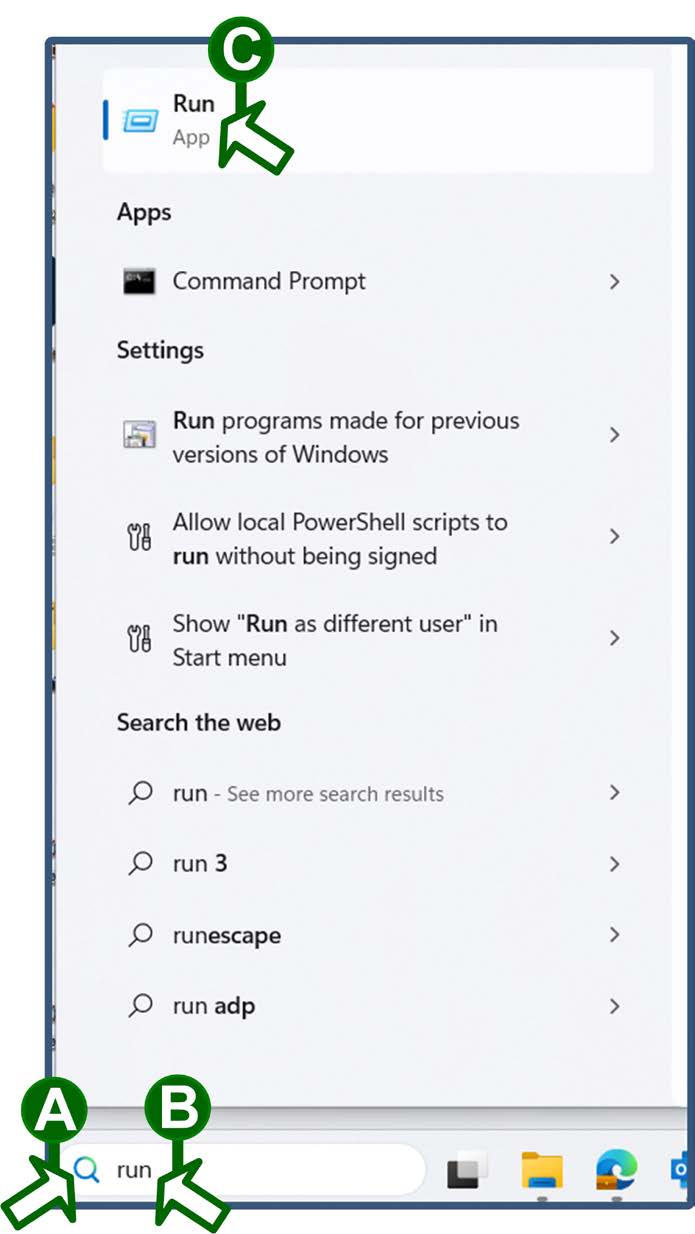
Access the “Run” function. To do so, click the magnifying glass icon in the desktop tray (if necessary), type run in the “Type here to search” field, and then select the Run app from the resulting list.
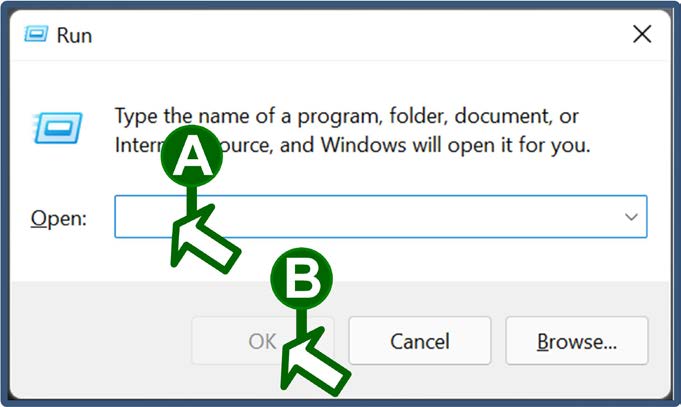
At the "Run" window, type the server name associated with your desired printer's location in the "Open" field and click the OK button.
📝 Note: You can choose from the following server name options:
- If your printer is at Site One, type \\SITE01-PRNTRS in the "Open" field.
- If your printer is at Site Two, type \\SITE02-PRNTRS in the "Open" field.
- If your printer is at Site Three, type \\SITE03-PRNTRS in the "Open" field.
At the resulting list of printers, scroll to the one you want to add and double-click it.
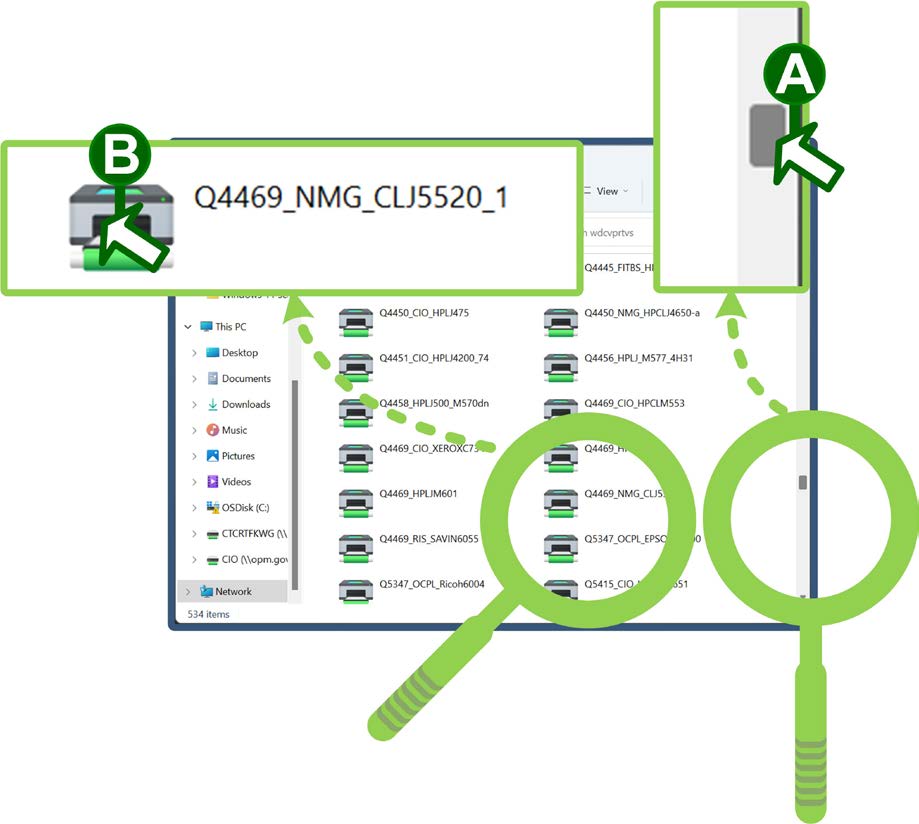
Wait for Windows to locate and install the driver for the printer. When the system finishes adding the printer, it presents its status window.

📝 Note: The time needed for this process can vary, depending on your system configuration and connection speed. It may take several minutes.
Removing a network printer
To remove a network printer, perform the following steps:
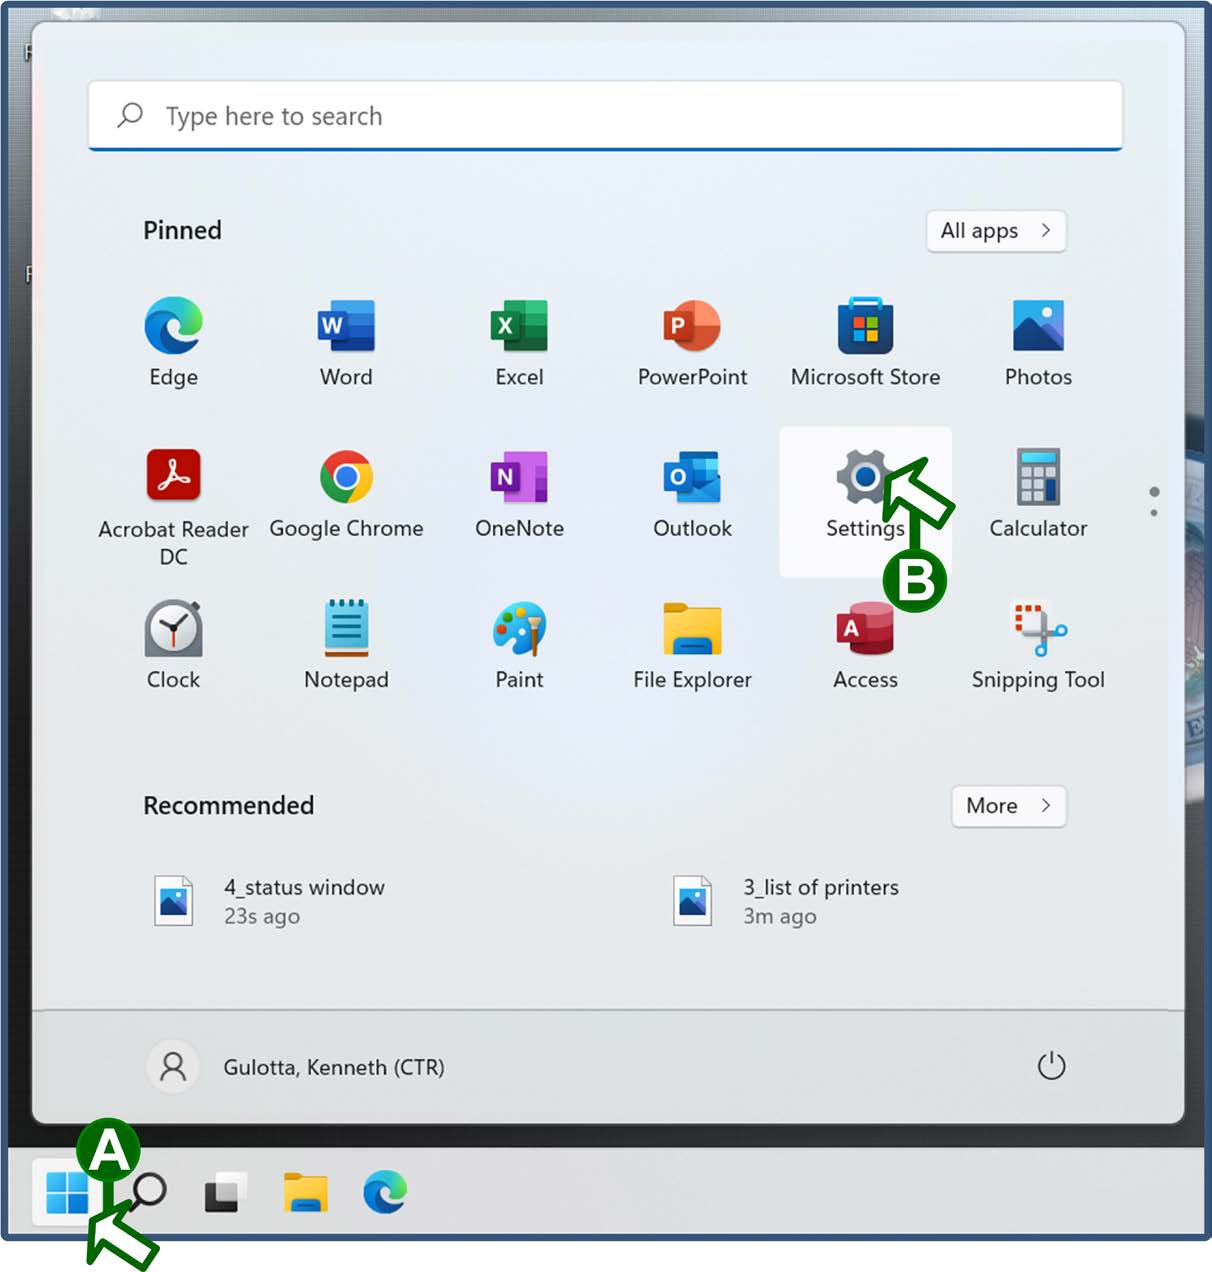
Click the Windows “start” button, and then click the Settings icon.
In the “Settings” window, select the Bluetooth & devices option in the left-hand column, and then select the Printers & scanners option in the right-hand pane.
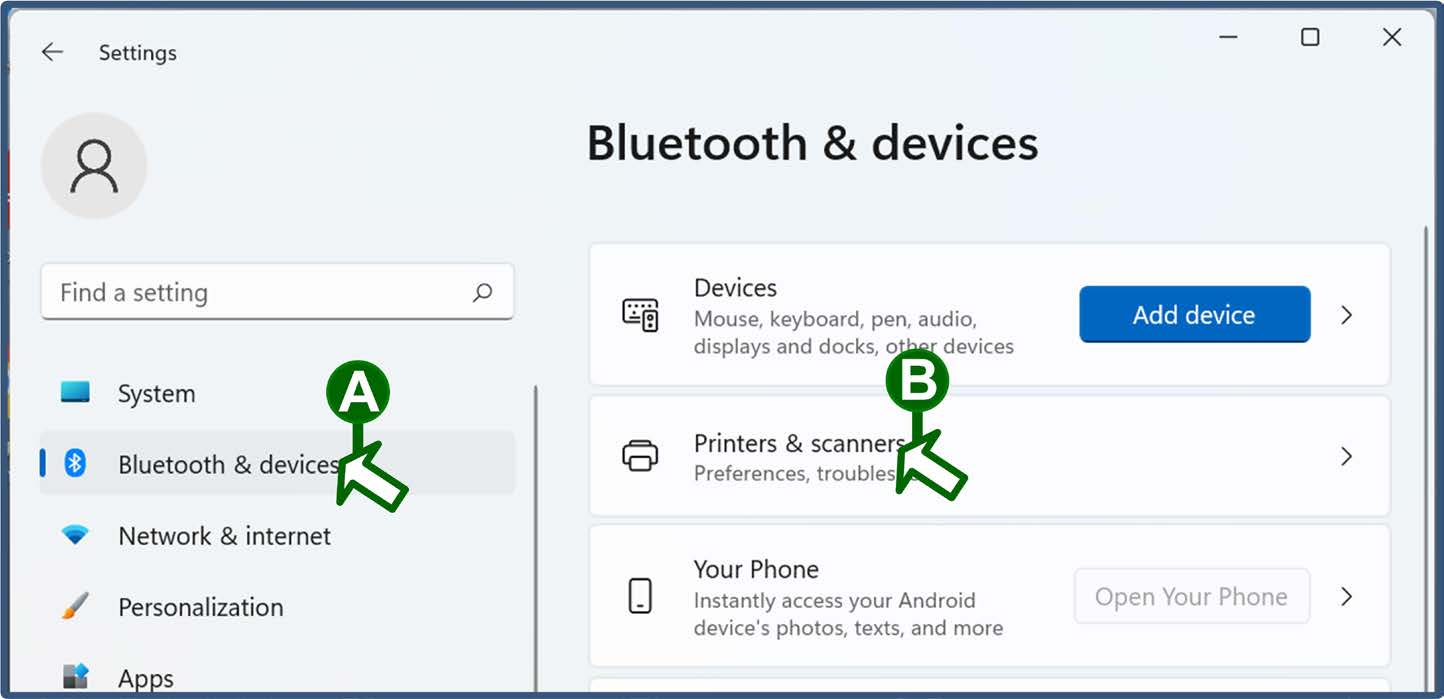
📝 Note: If the option does not appear, drag a corner of the “Settings” window to expand it and access all its panels.
In the right-hand pane, click the listing for the printer that you want to remove.
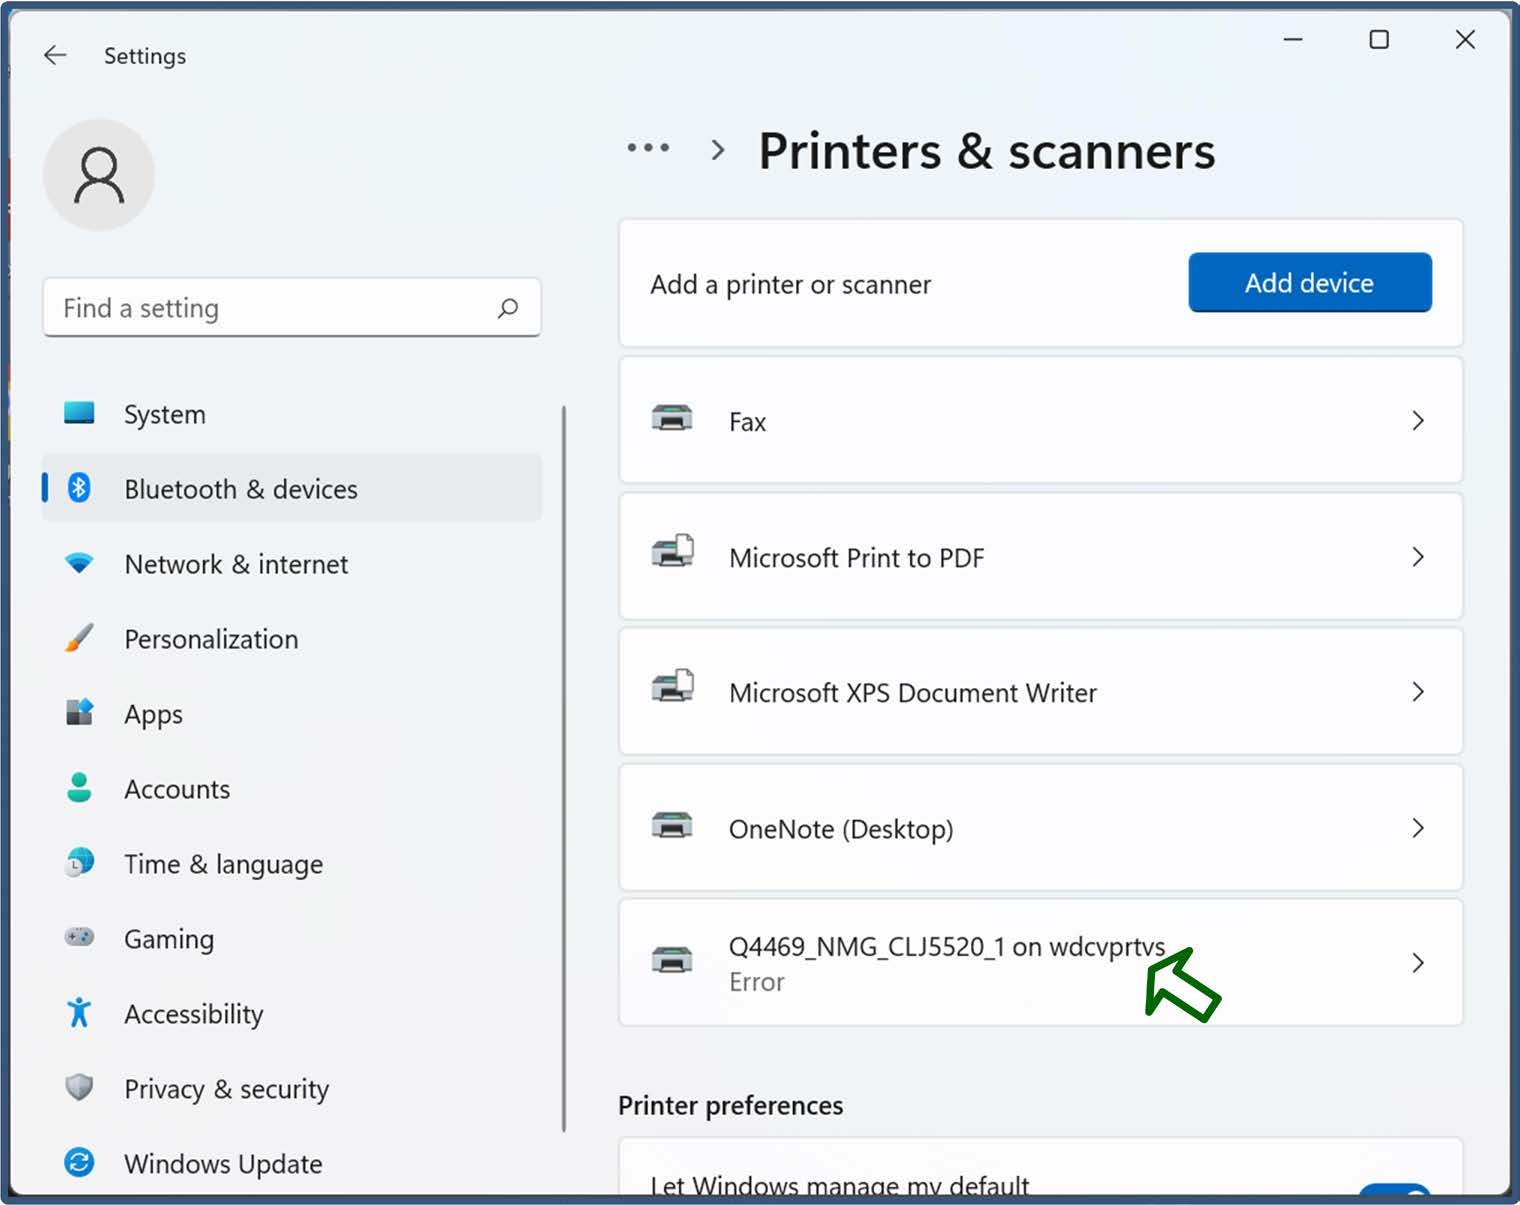
Click the Remove button next to the printer listing.
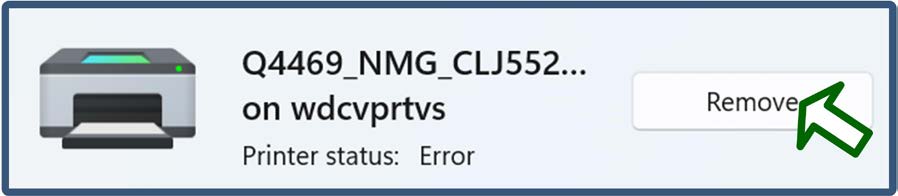
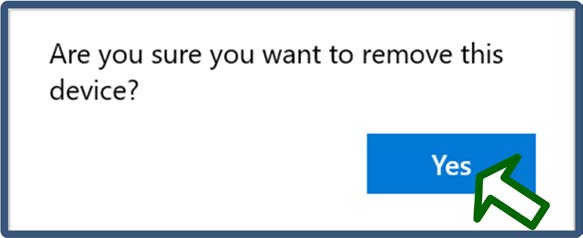
Click the Yes button at the confirmation prompt.
Some New Windows 11 Features
Windows 11 includes new navigational methods and functional enhancements to simplify how you access and interact with the tools you use most often. For information, see the following sections:
📝 Note: For more detailed information about the features of Windows 11, see the Microsoft Windows support site.
The Windows 11 Start menu
With Windows 11, you get a “start” menu interface that puts more of your apps and frequently-used items within easy reach.
When you click the new “start” button in the taskbar, the system presents the extended menu—a panel of suggested applications and dedicated options. It includes access to:
- The “search” field.
- Your pinned apps. The menu includes a default set, but you can change the order of the apps and choose apps to pin. You can also click the All apps button to access your full menu of applications.
- Recommended files that you have recently accessed. You can click the More button to see additional files.
The Power button, which provides access to shutdown options.

To change the order of the pinned apps, click and drag the app that you want to move, and then release it in its new location.
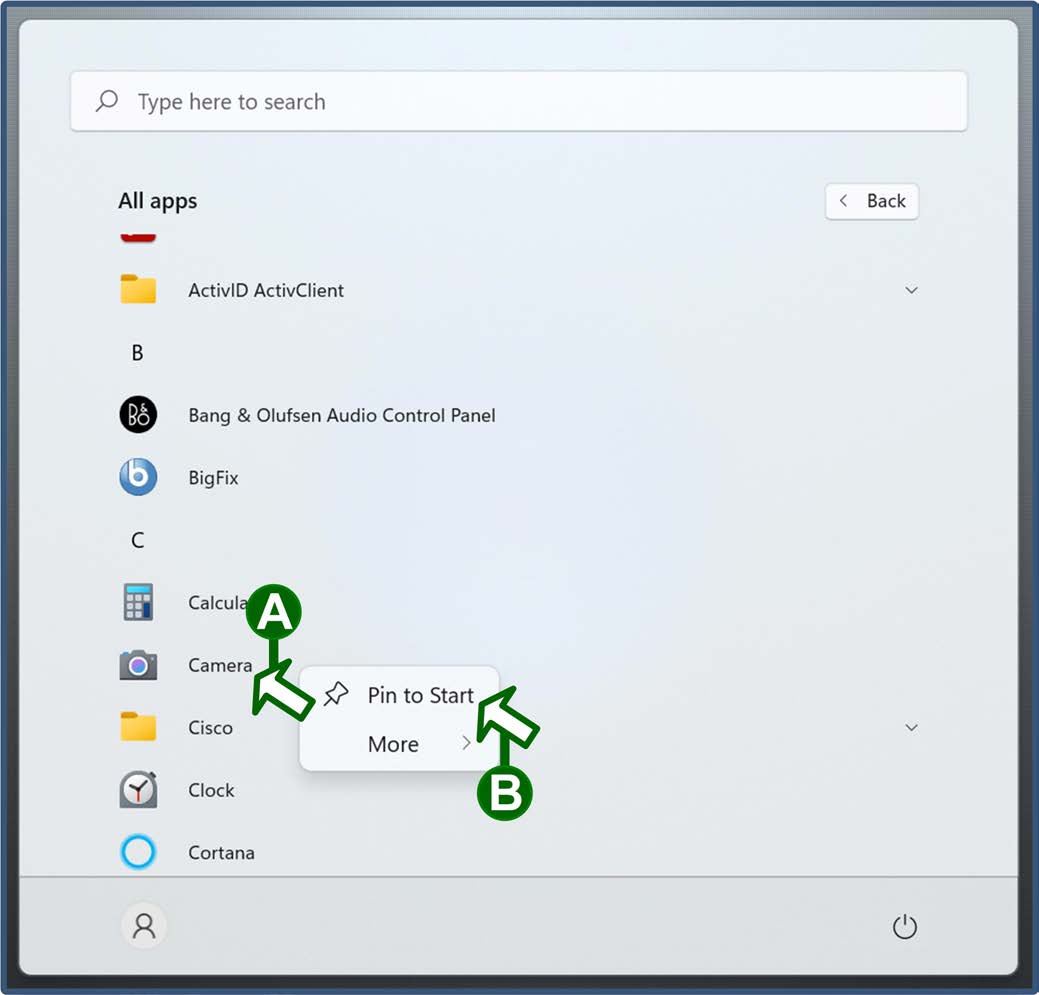
To pin an additional app, search for it or locate it in the “All apps” list. Right-click it, and then choose the Pin to Start option from the resulting pop-up menu.
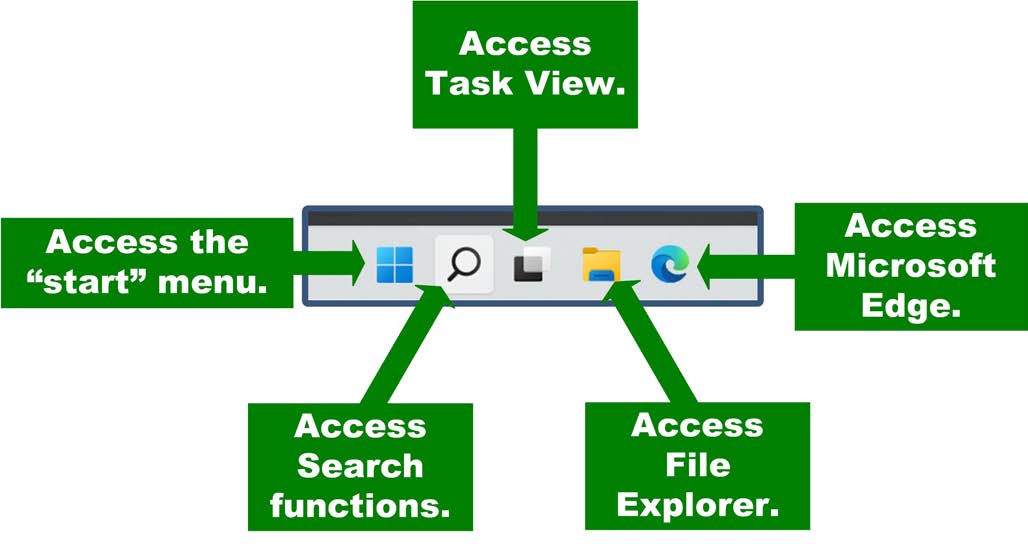
The Windows 11 taskbar
The Windows 11 taskbar gives you access to all the applications, settings, and files on your system. The new version is streamlined for easy access and centered in your system tray by default.
The basic taskbar provides icons that enable you to access:
- The “start” menu.
- The “Search” interface.
- The “Task View” functions, which enable you to choose or create different desktops for managing specific sets of tasks or jobs.
- File Explorer.
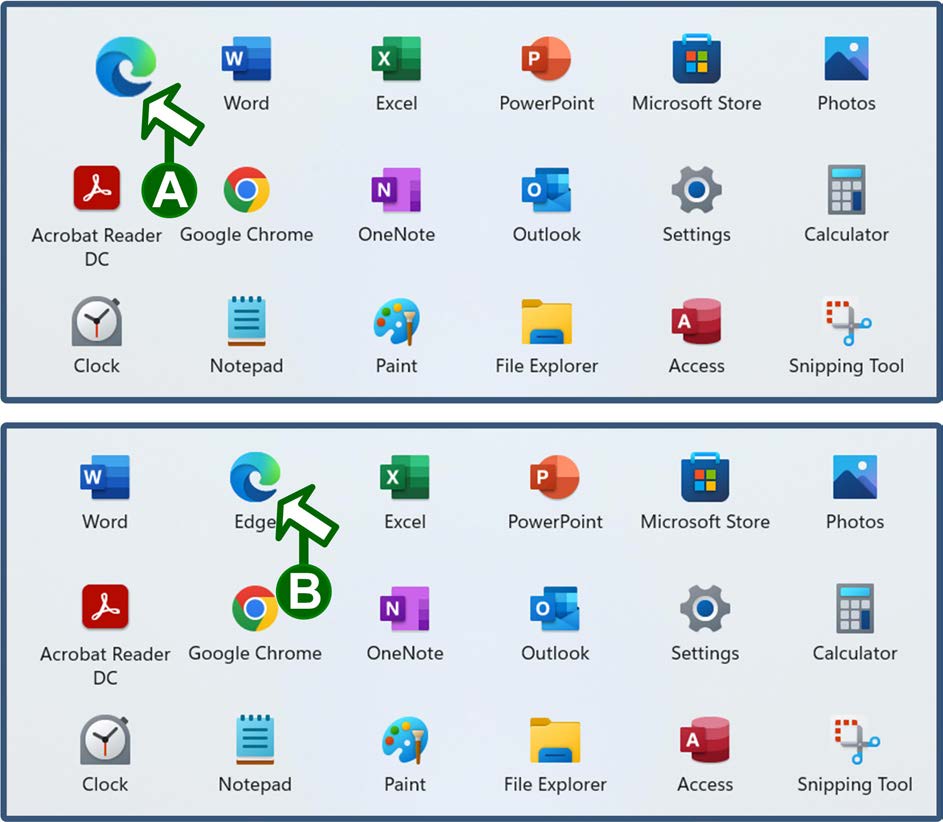
- Microsoft Edge.
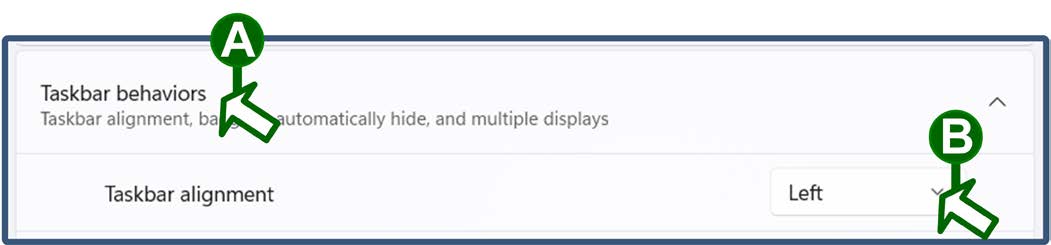
The agency configures your laptop to align your taskbar to the left the first time you log into Windows 11. The automatic alignment process may take a few minutes. You can also manually change the alignment of your taskbar. To do so, perform the following steps:
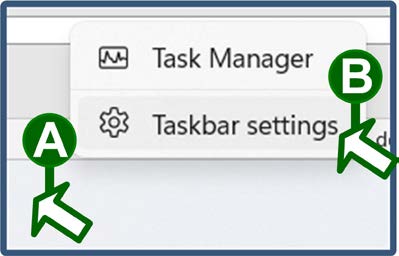
Right-click an empty space on the taskbar and select the Taskbar settings option from the resulting menu.
Open the Taskbar behaviors section at the bottom of the resulting window. Then, click the Taskbar alignment drop-down menu and choose whether the taskbar should be aligned to the left or centered.
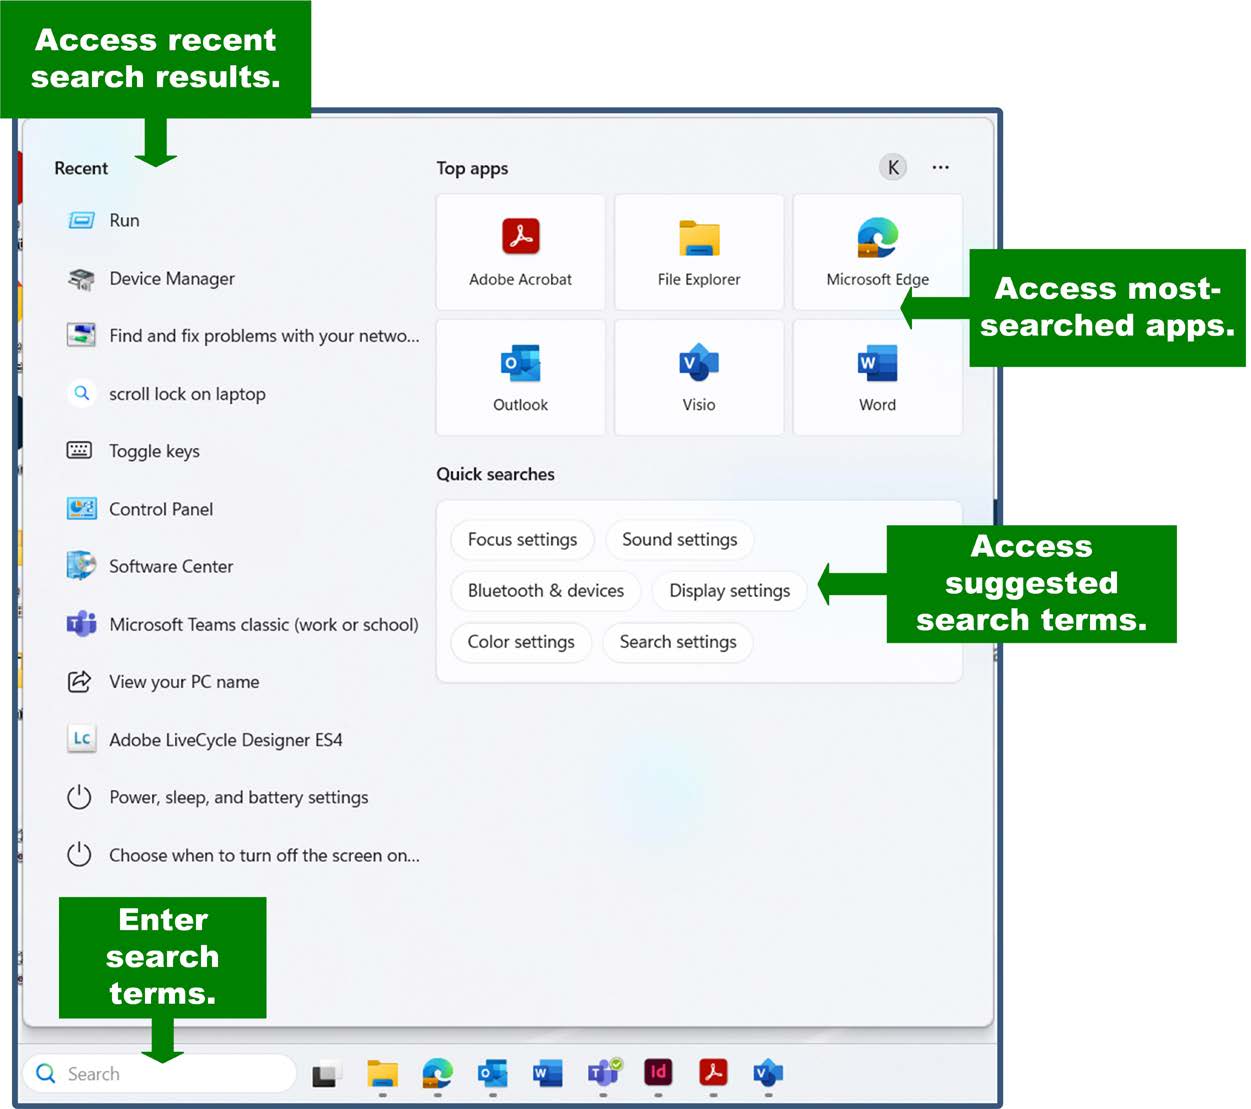
When you click the Search icon or field, you access a robust search interface that enables you to:
- Enter terms to search for apps and tools on your system and the Internet.
- Access a list of your recent search results.
- Access sets of suggested search terms.
- Access a set of the top, most-searched apps.
When you click the Task View icon, you access a simple interface for:
- Creating new desktops that you can configure for specific tasks, choosing which applications you want to use as defaults.
- Choosing which of your available desktops to use.
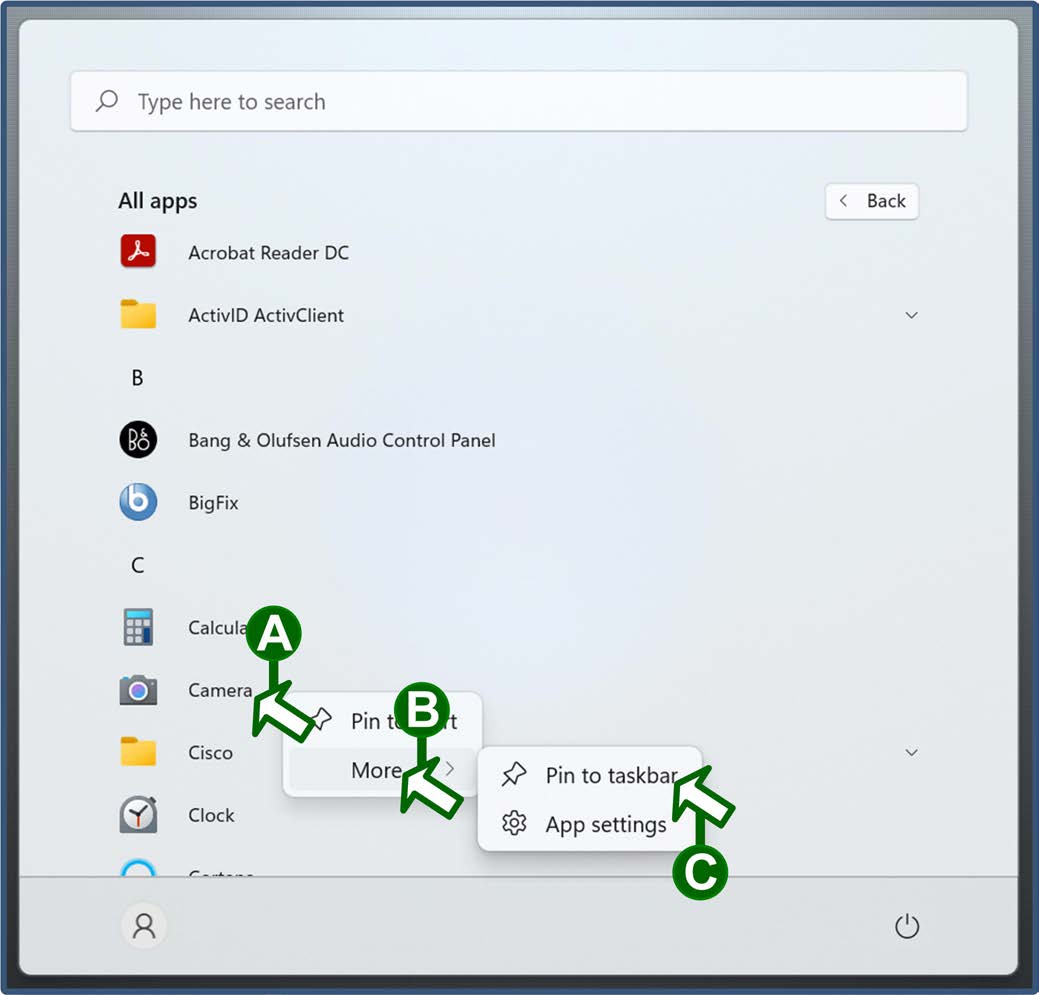
You can also choose additional applications to include in your Windows 11 taskbar. To do so, search for the application or locate it in the “All apps” list. Right click it, select the More option from the resulting pop-up menu, and select the Pin to taskbar option.
Changes to the File Explorer interface
In Windows 11, File Explorer includes the functions you know from past versions, but with a new, simplified interface. Rather than navigating a Ribbon and menu system, you can access most of the basic functions directly through icons at the top of the window.
For example, each File Explorer window includes icons that enable you to:
- Cut files or folders in preparation to paste them somewhere else.
- Copy files or folders.
- Paste files or folders in your current location.
- Rename files or folders.
- Share files or folders with colleagues.
- Delete files or folders.
- Choose how items are sorted in your current window.
- Choose a different presentation method for the items in your current window.
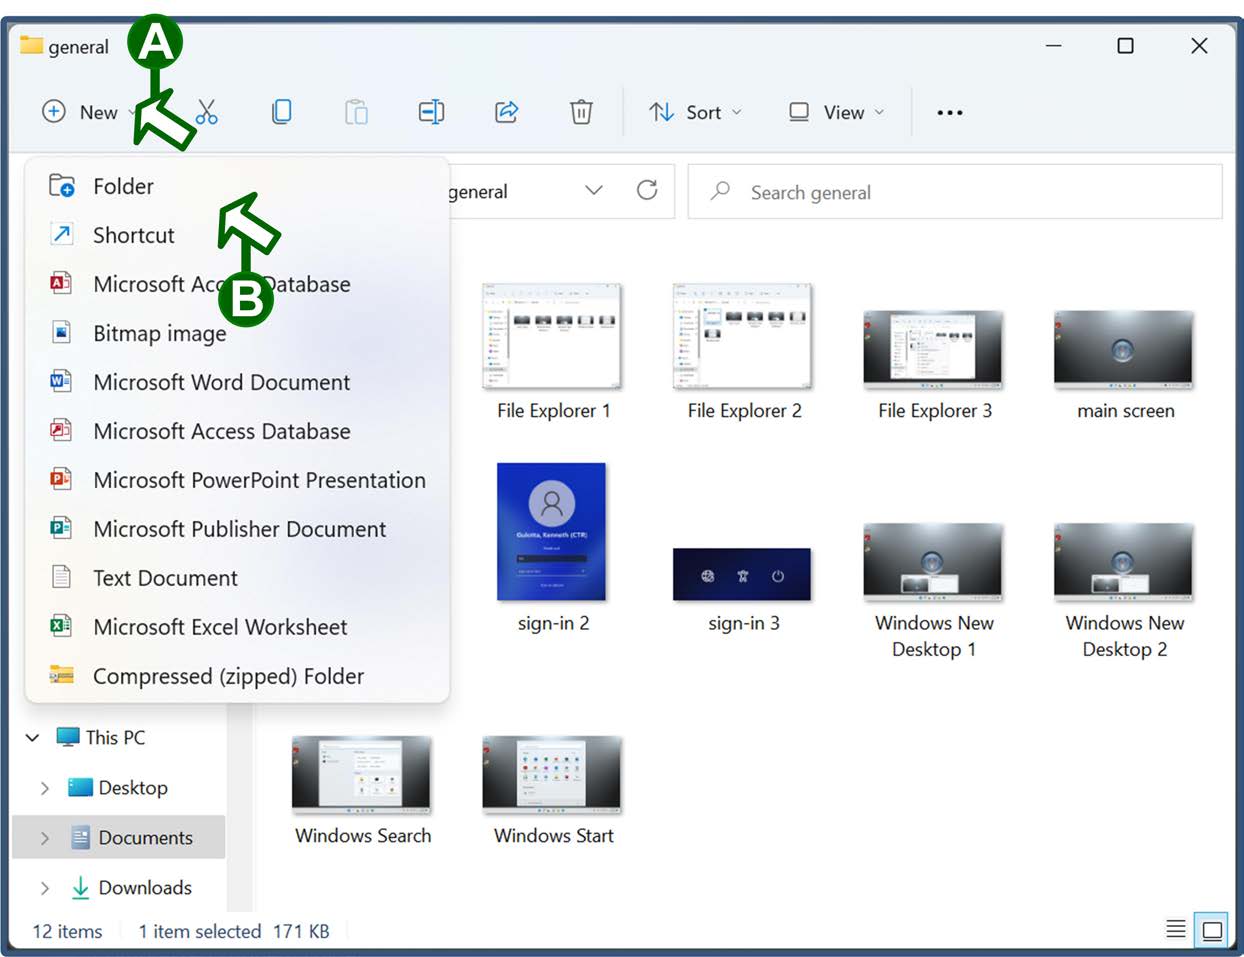
To create new folders or files in your current window, click the New button in the upper-left corner, and then select an option from the resulting drop-down menu.
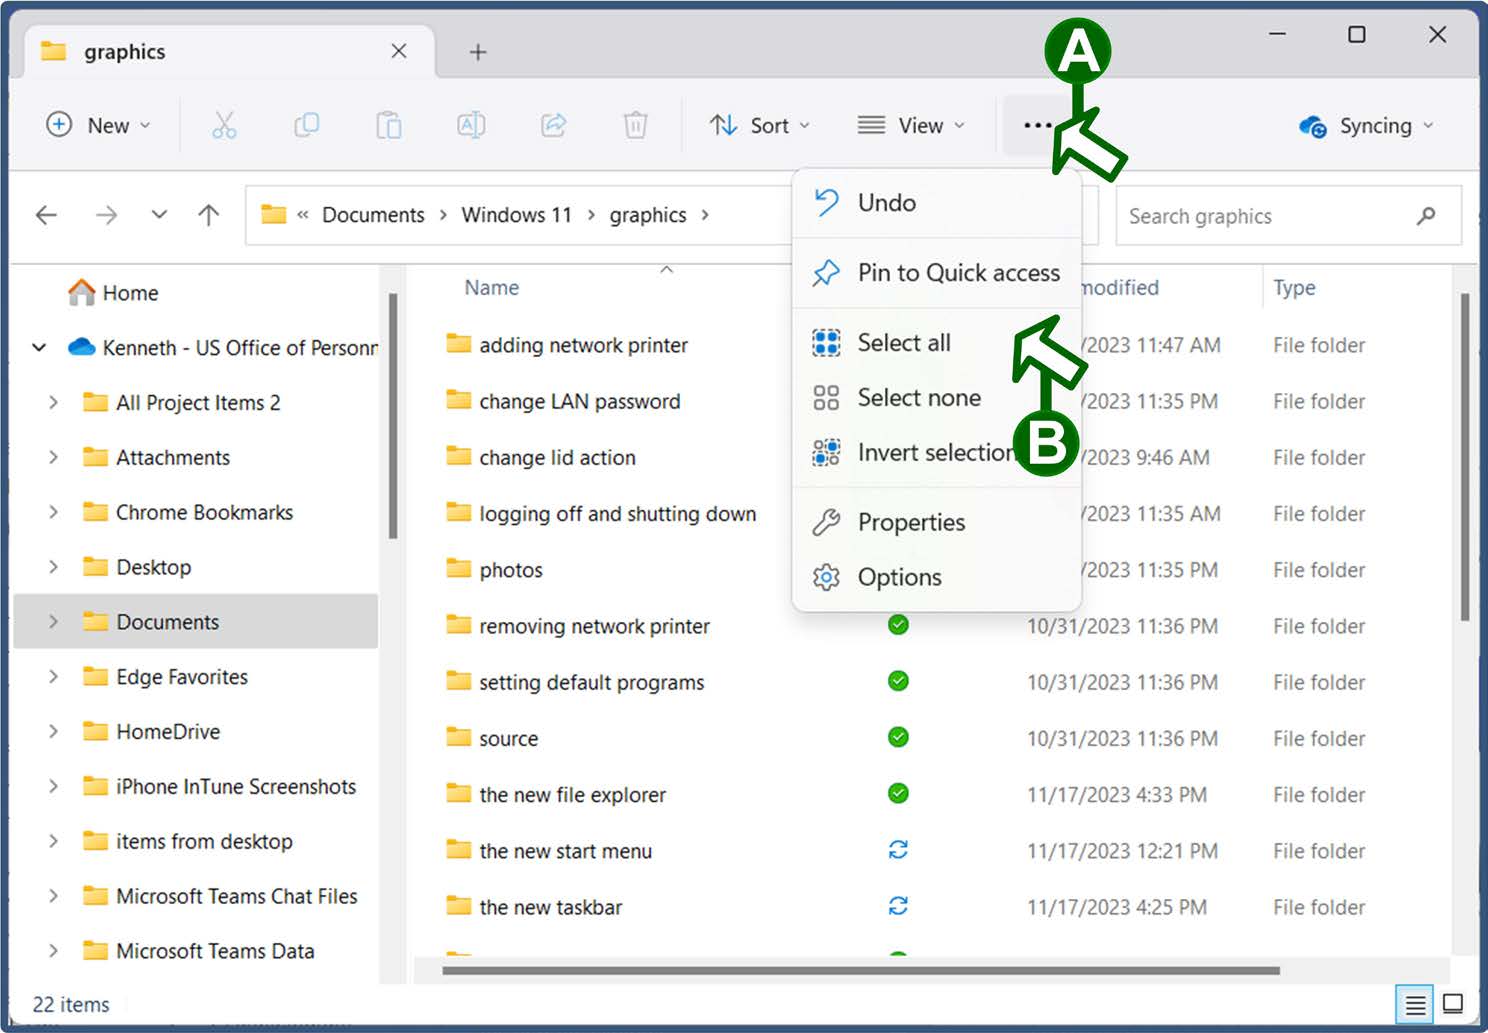
To access additional File Explorer commands, click the More button (the one that looks like an ellipsis) in the upper-right corner of the window, and then select an option from the resulting drop-down menu.
Changing your LAN password from Windows 11
On a regular basis, you will be prompted to change your network password—the Local Area Network (LAN) password that you use to log onto agency webmail and other network systems. To do so, perform the following steps:
- If necessary, turn on your computer and connect to the agency network.
📝 Note: In order to change your password, you must either connect directly to the Local Area Network (LAN) if you are on-site or connect to the Virtual Private Network (VPN) if you are off-site. For information, see the “Connecting to the Network and Logging in with Windows 11 On-Site” and “Connecting to the Network and Logging in with Windows 11 from a Remote Location” sections.
- Press the CTRL-ALT-DELETE key combination.
Click the Change a password option.
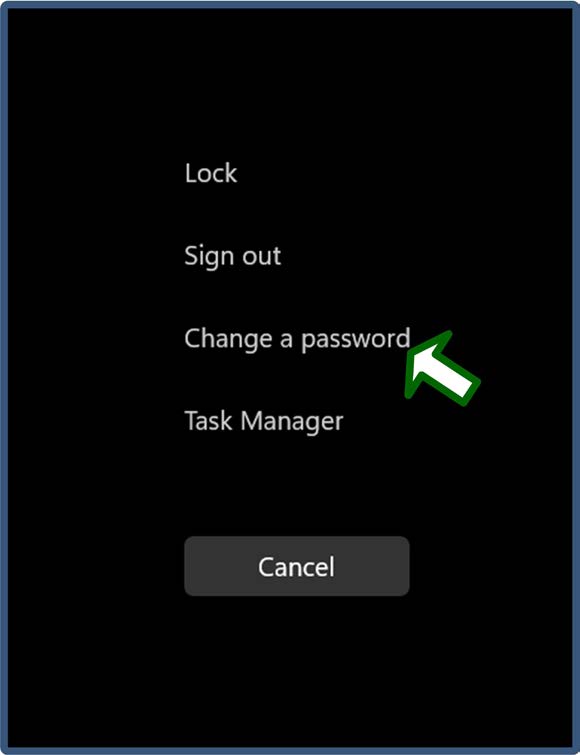
Ensure that the system is set to change the LAN password. To do so, click the Sign-in options link, if necessary, and then select the Password option (the icon shaped like a key).
At the “Change a password” screen, enter your current password in the “Old password” field. Then, enter your new password in the "New password" and "Confirm password" fields. Finally, to submit the password change, either press the ENTER key or click the arrow button.
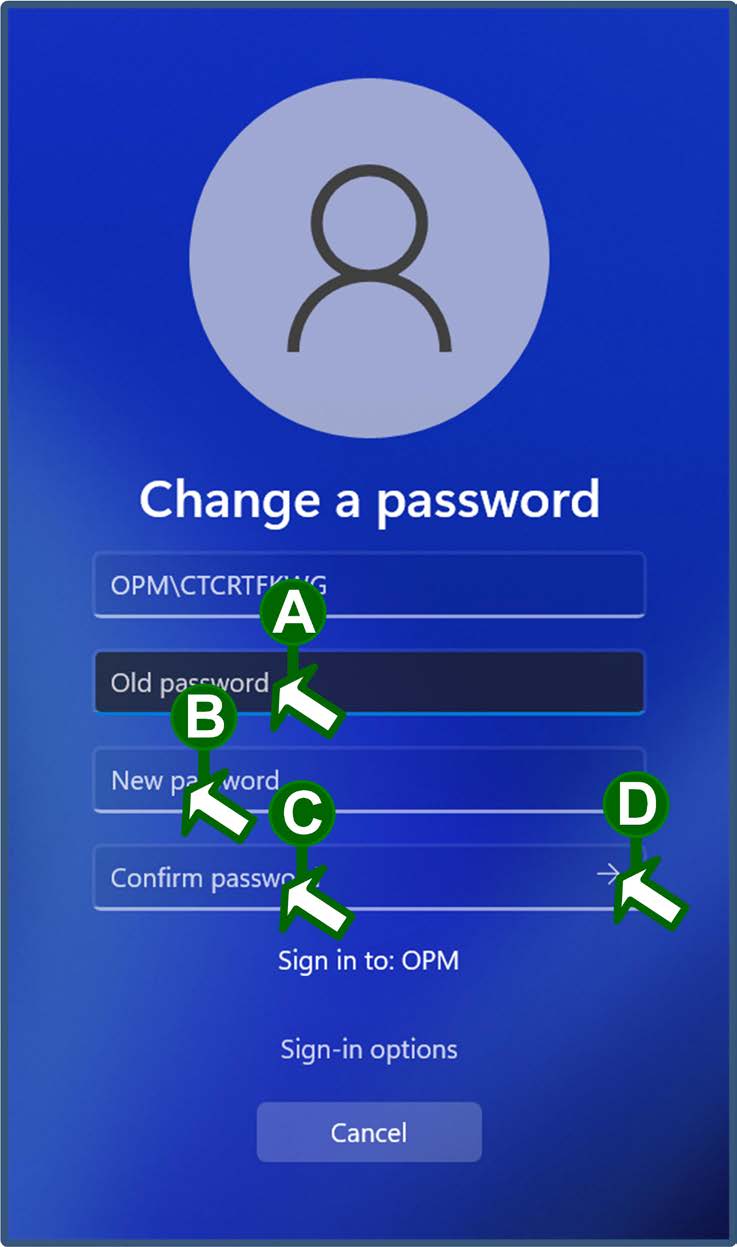
📝 Note: Your password must be at least eight characters long, and it must contain at least three of the following four character types: upper-case letters, lower-case letters, numbers, and special characters such as percent symbols or dollar signs. The system remembers your previous six passwords. You may not re-use a password until you have used at least six others.
Wait while the system completes the password change. When it is done, click the OK button at the confirmation prompt.

Setting default applications in Windows 11
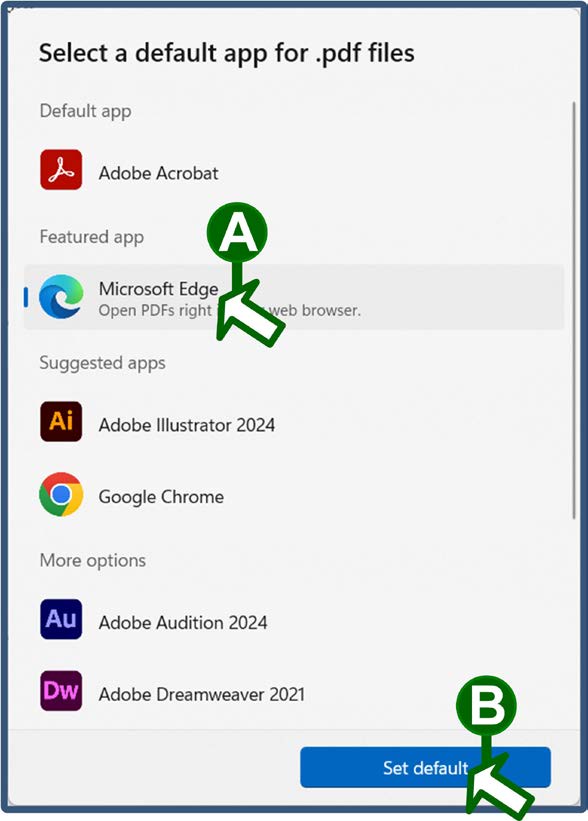
Agency laptops are typically configured to use default programs for specific tasks—for example, Microsoft Edge is the default web browser and Adobe Reader is the default PDF reader. However, you can manage your default settings, configuring them for your specific work needs. To do so, perform the following steps:
At the Windows 11 desktop screen, click the magnifying glass icon in the taskbar, if necessary. Then, type default in the "Type here to search field" and select the Default apps option from the list of possible matches.
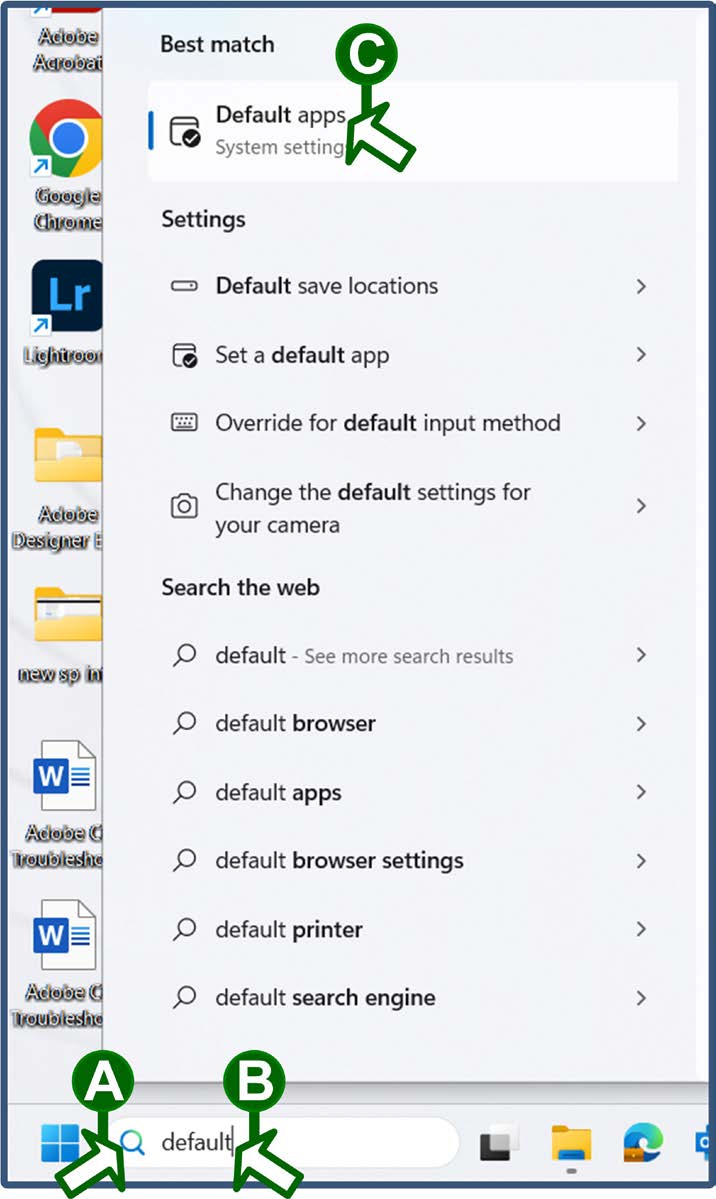
To set an application as your default (for example, to make Google Chrome your default web browser), locate and click the application in the list.

📝 Note: If the “Default apps” list does not appear, drag a corner of the “Settings” window to expand it and access all its panels.
Click the Set default button next to the prompt to make the application your default choice.
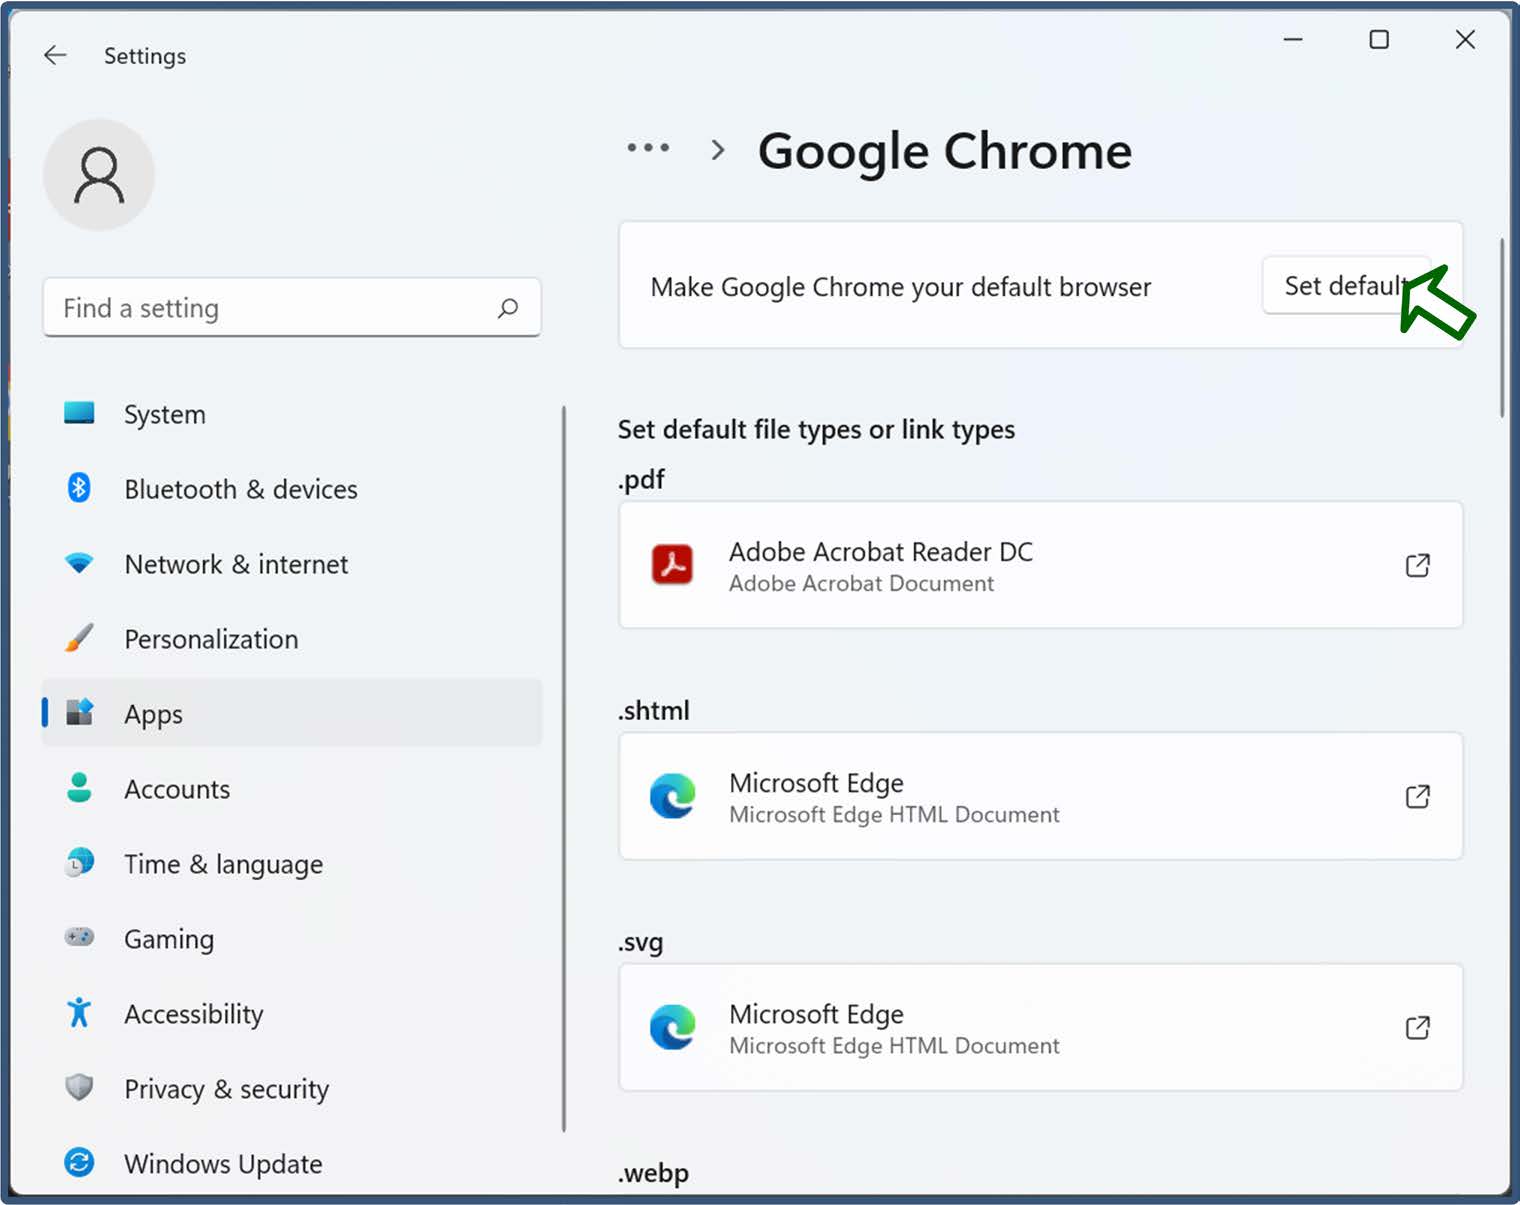
You can also choose to set default apps by file type. To do so, perform the following steps:
At the “Default apps” screen, scroll to the bottom of the list of apps, and then click the Choose defaults by file type option.
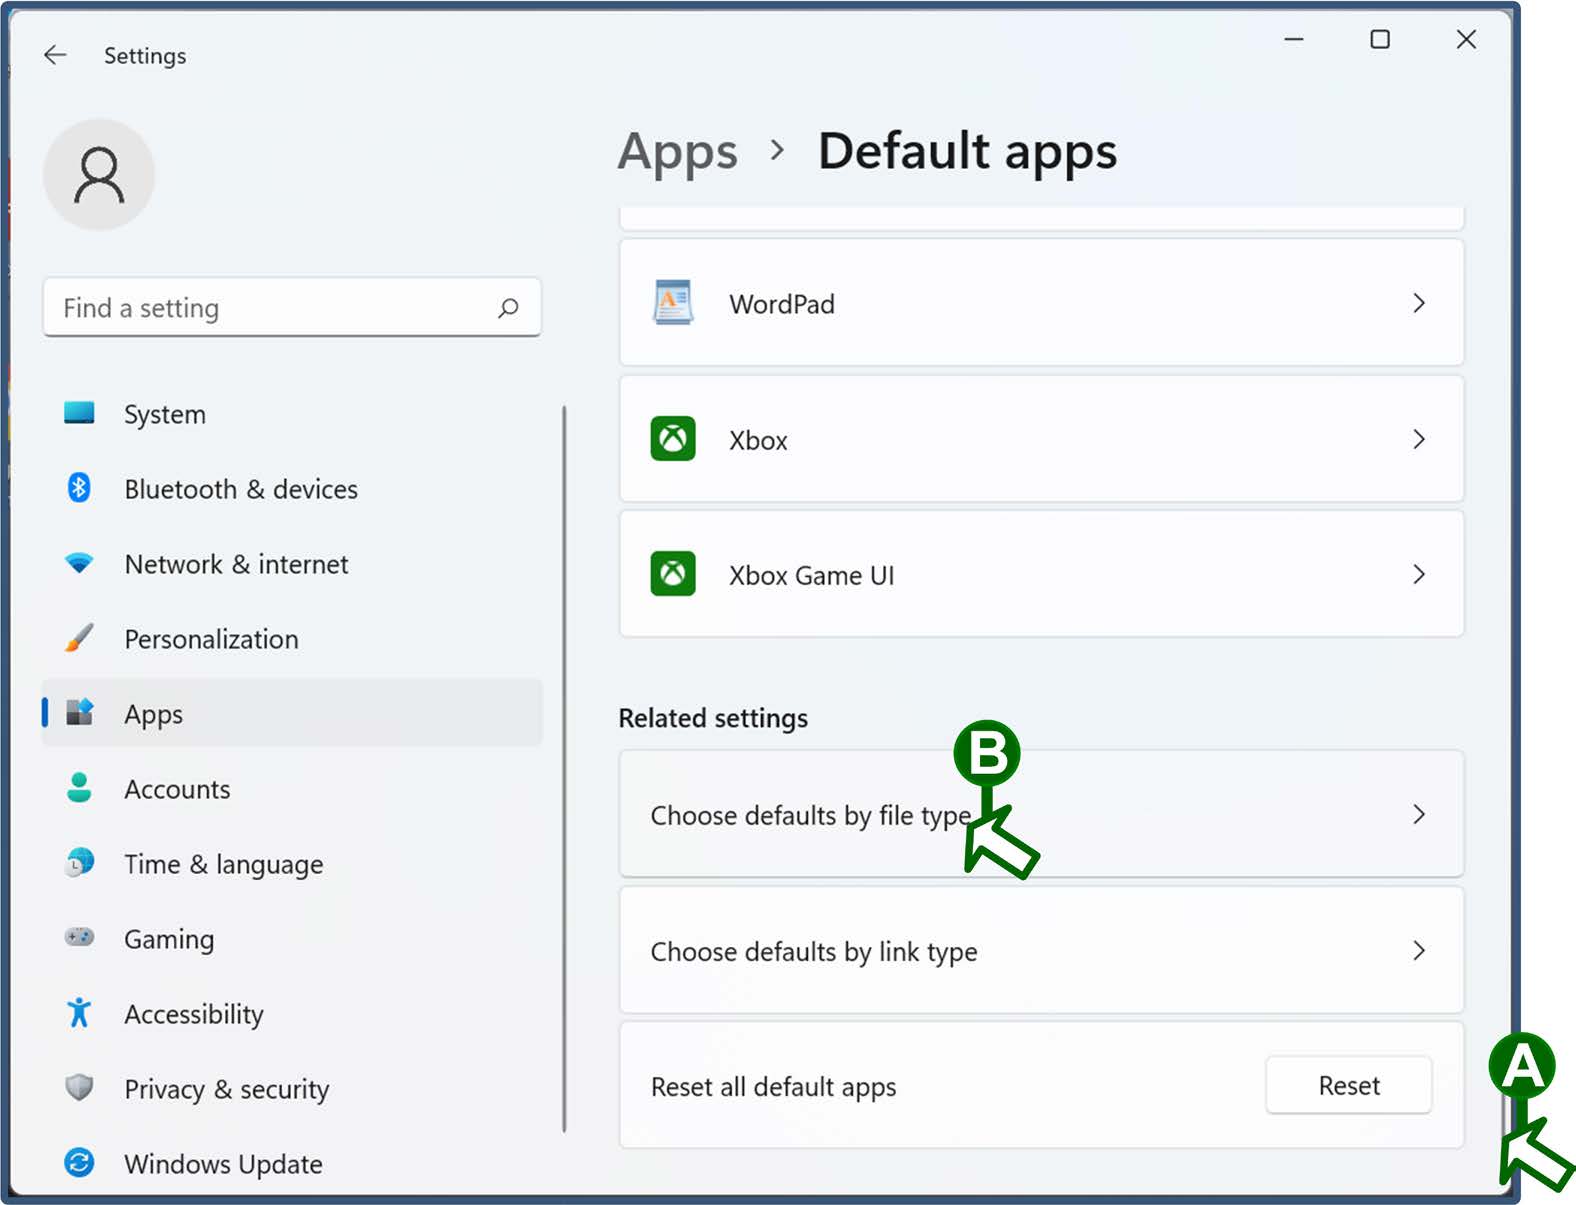
Locate and click the default for a file type (for example, PDFs) that you want to change.
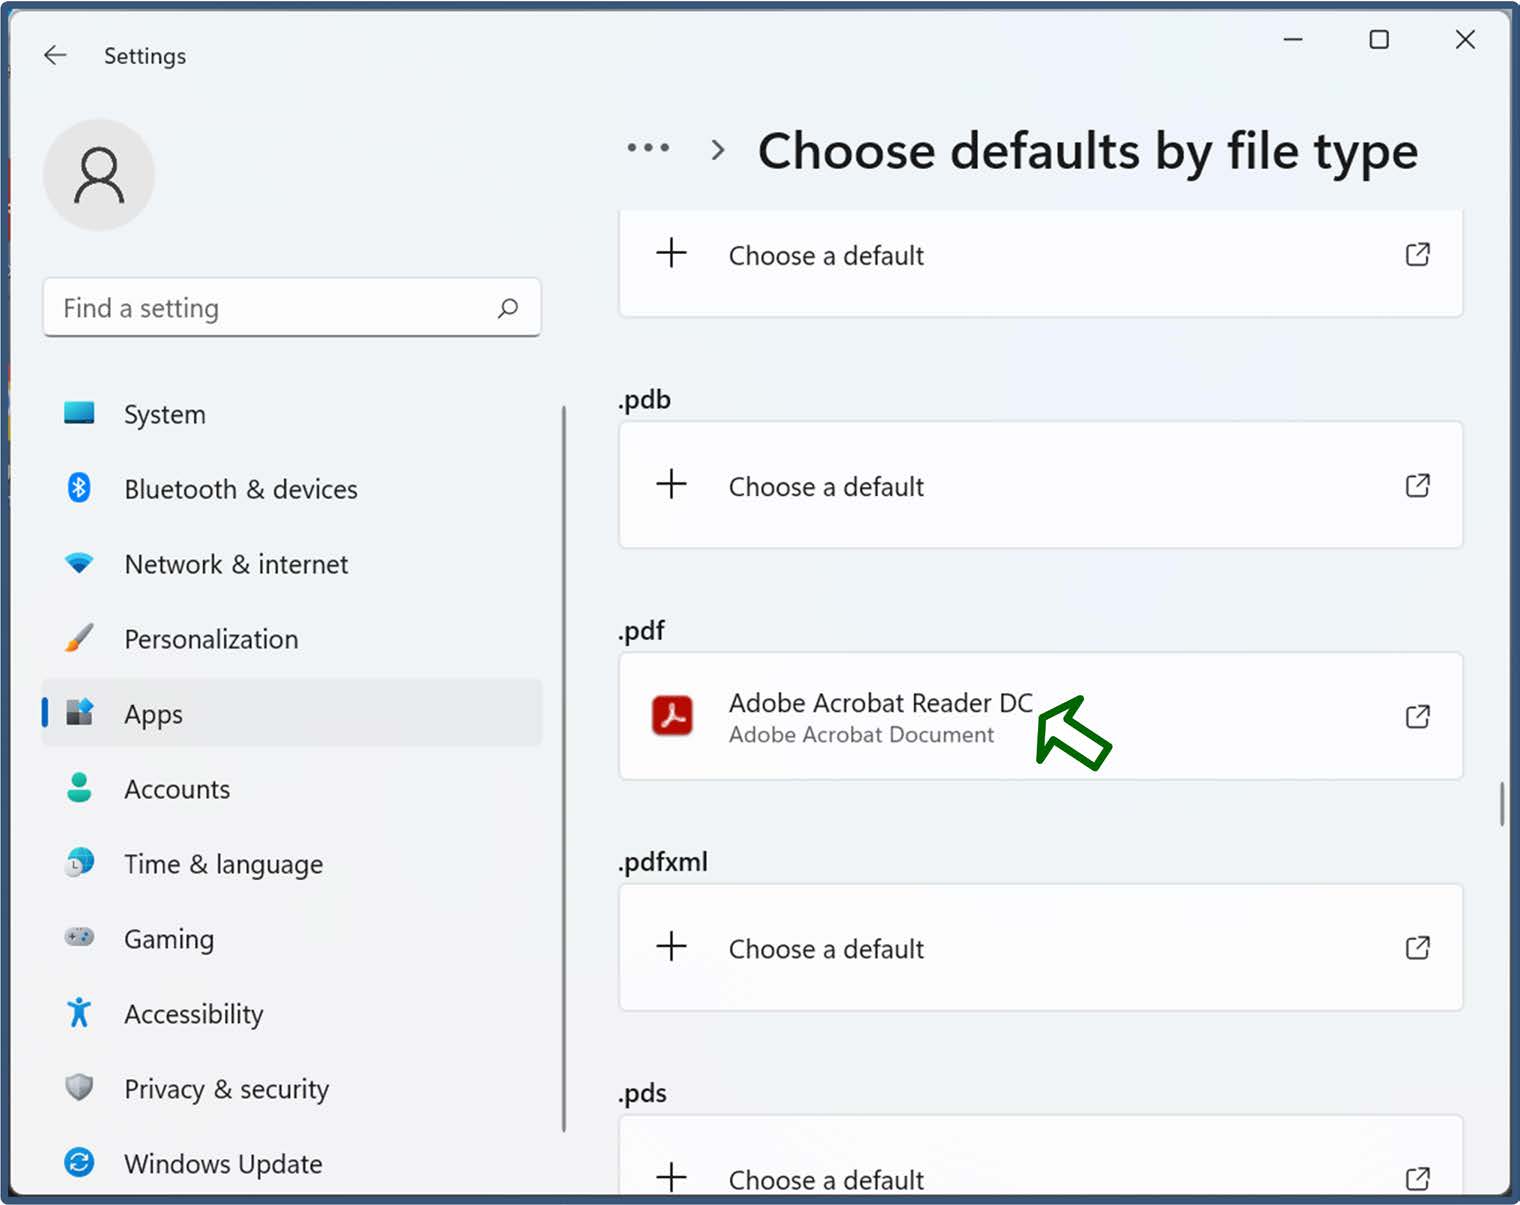
Select your default application from the listed options and click the Set default button.
Preventing a laptop from entering sleep mode when it is closed
In Windows 11, the default setting puts your laptop in sleep mode whenever you close it, even if you are connected to a dock and an external monitor. You can change this default setting to keep your laptop active when it is closed. To do so, perform the following steps:
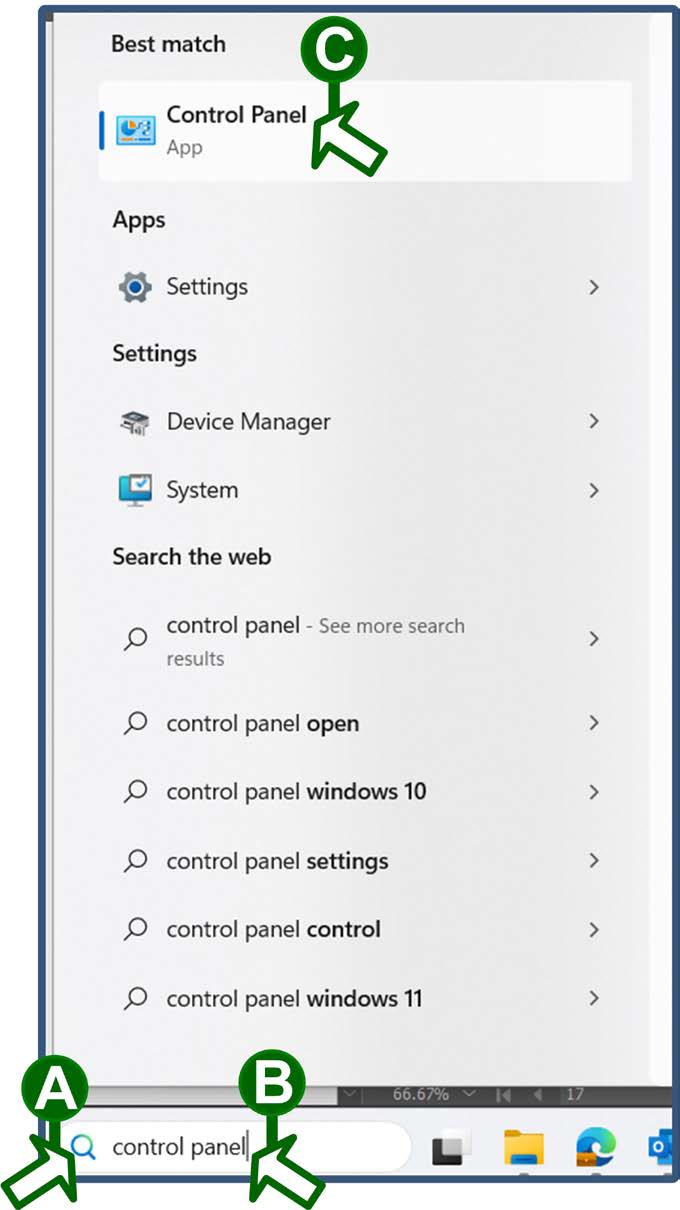
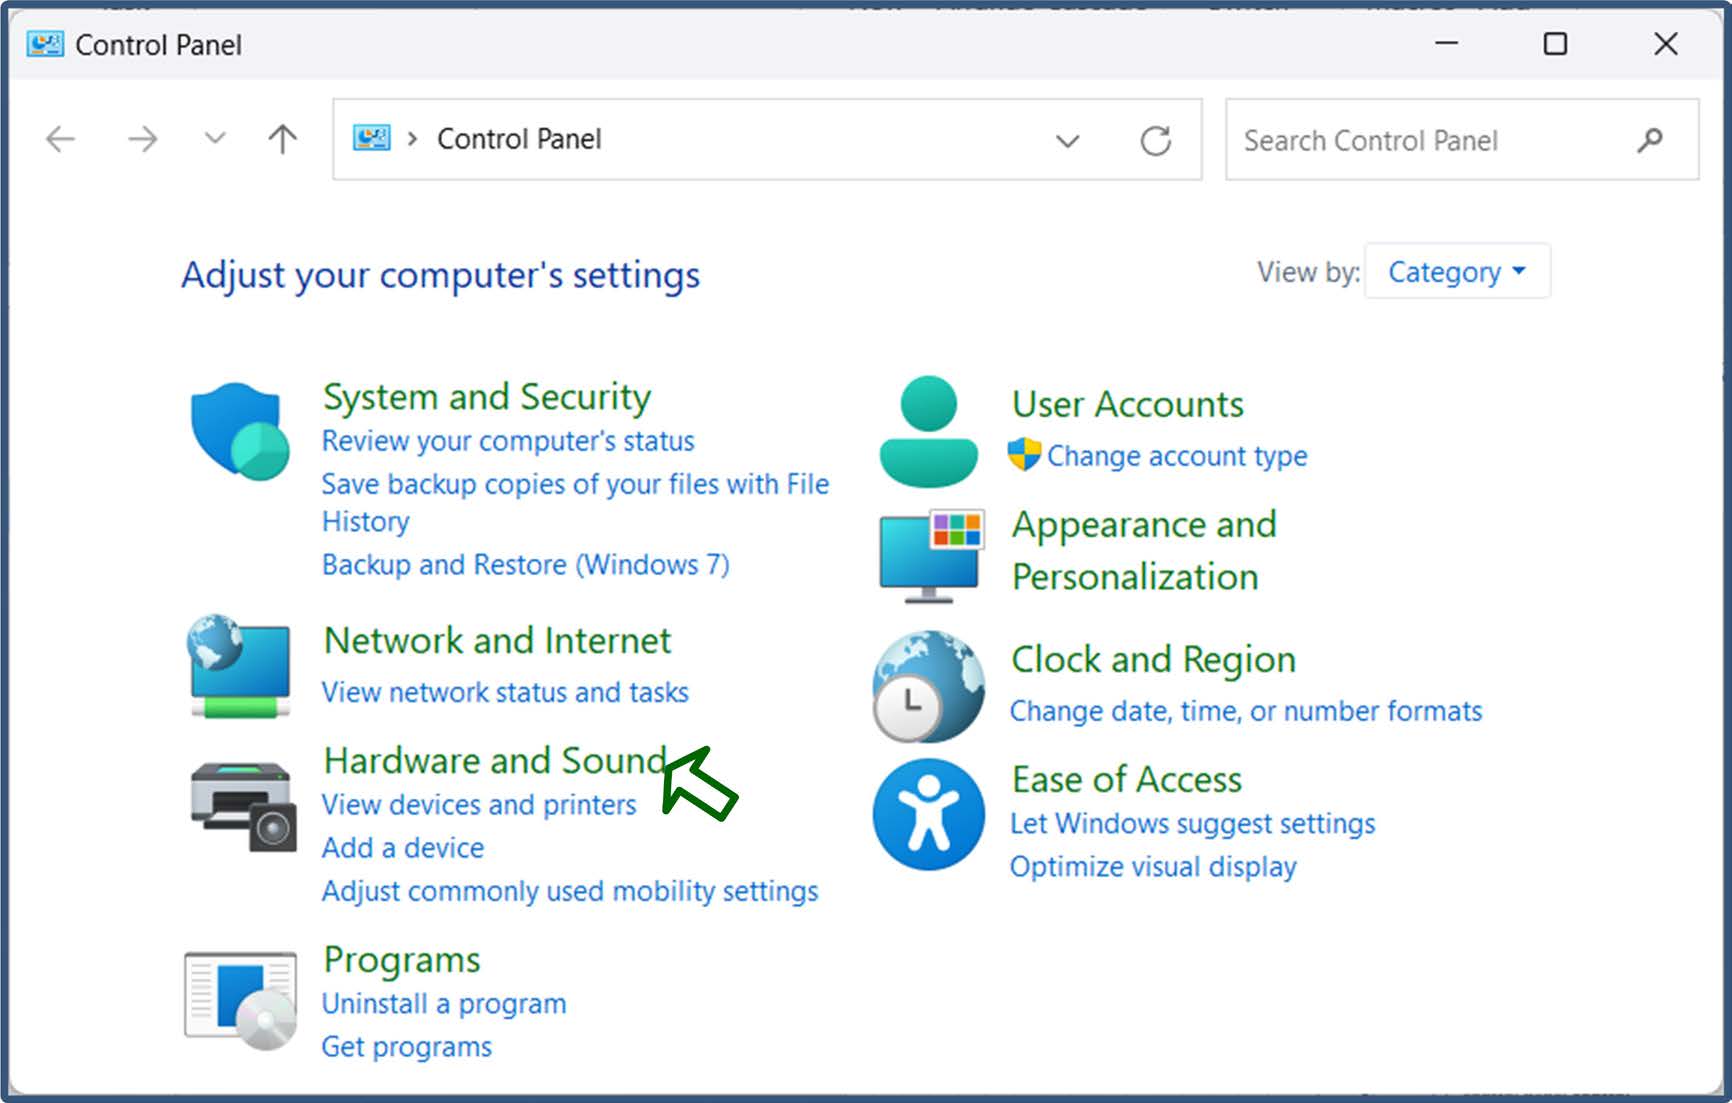
At the Windows 11 desktop screen, click the magnifying glass icon in the taskbar, if necessary. Then, type control panel in the "Type here to search field" and select the Control Panel option from the list of possible matches.
Click the Hardware and Sound category in the “Control Panel” window.
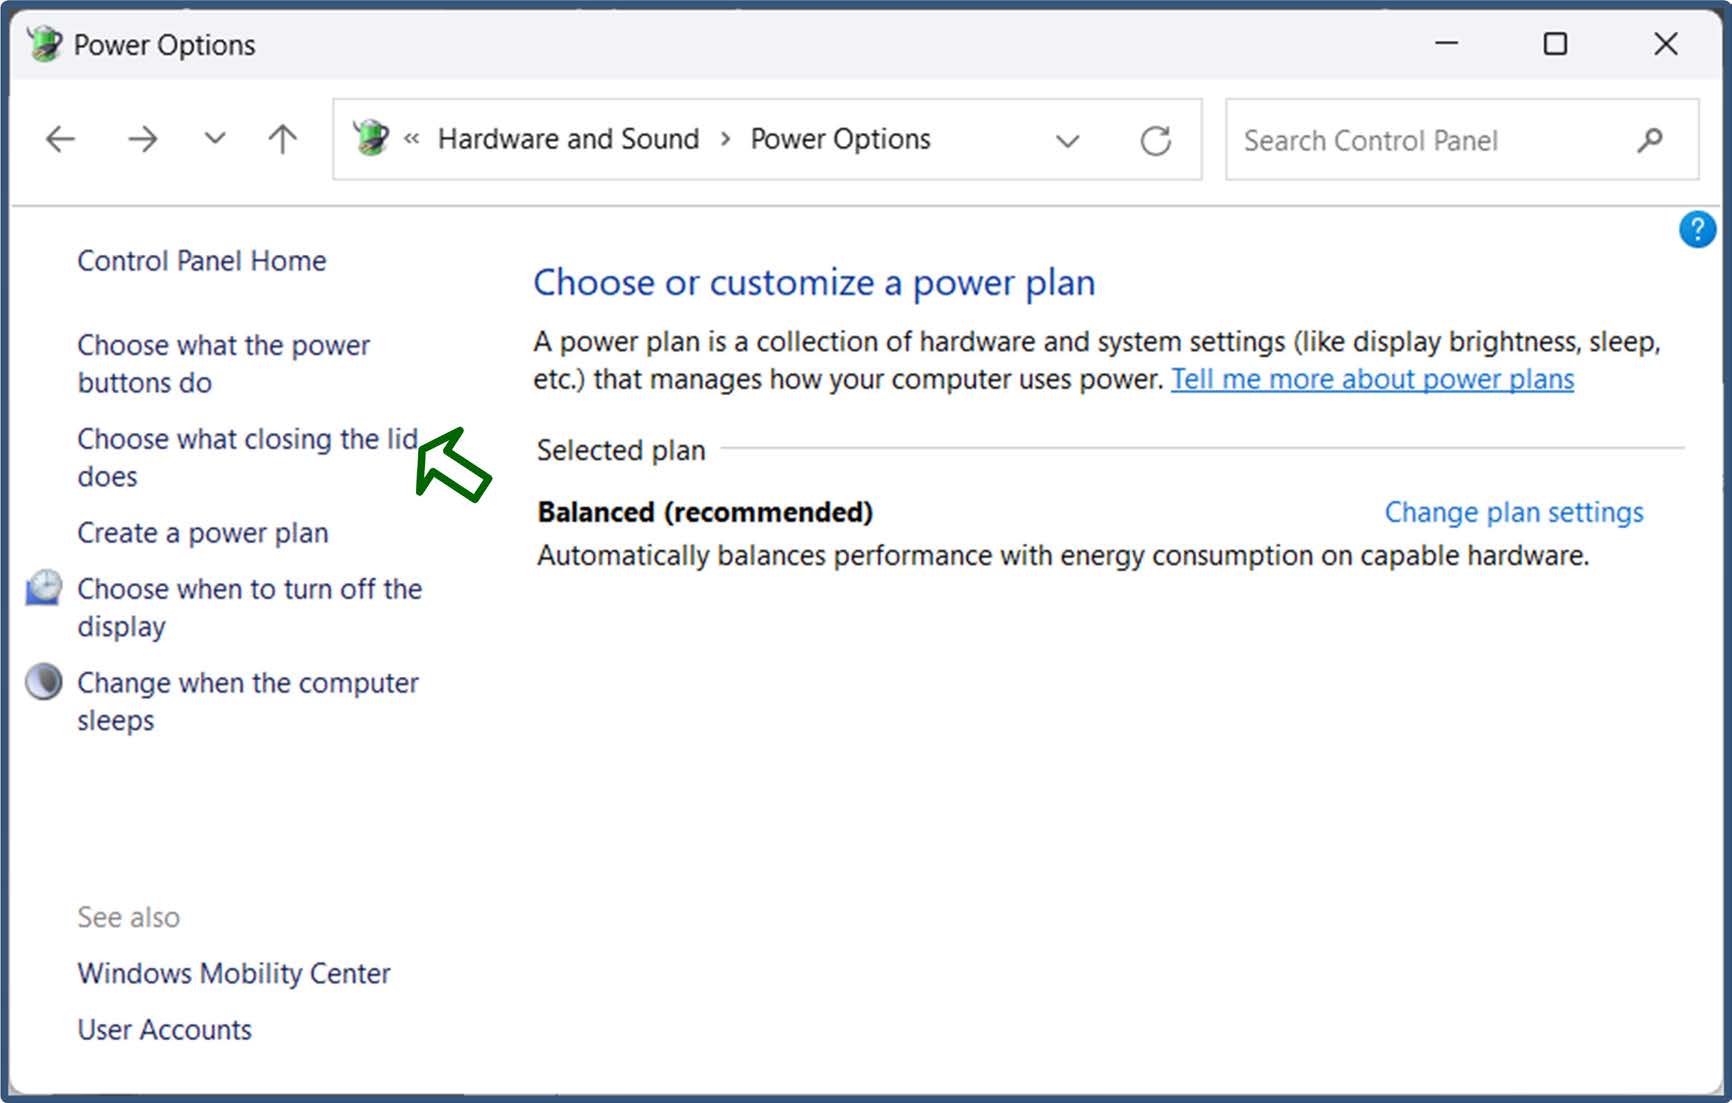
In the “Power Options” window, click the Choose what closing the lid does option.
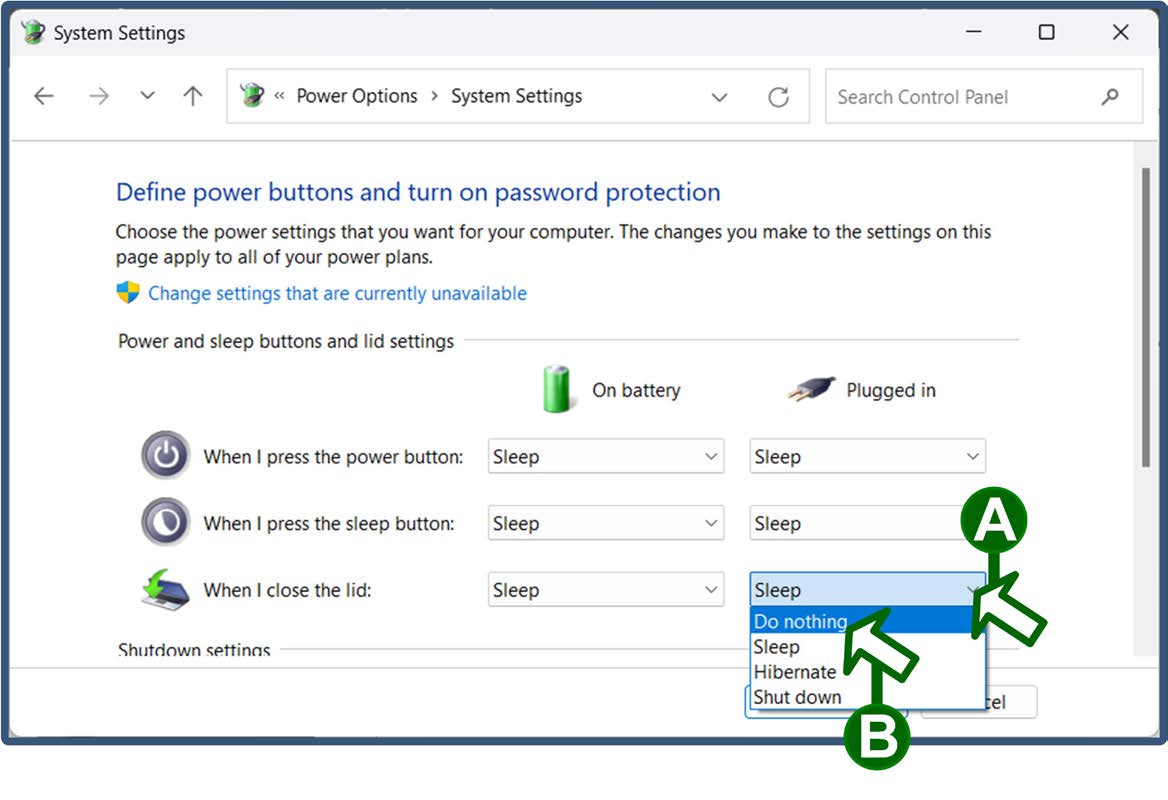
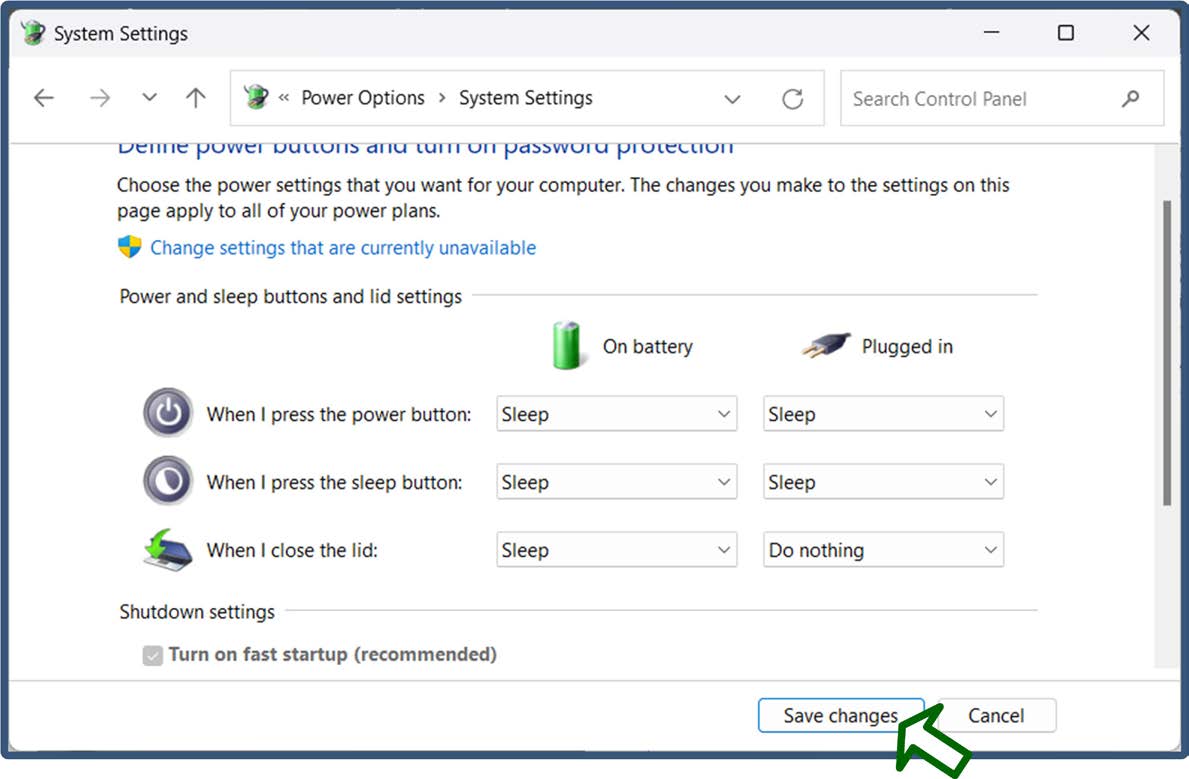
In the “System Settings” window, click the drop-down menu button for the When I close the lid setting under the “Plugged in” column, and then select the Do nothing option.
Click the Save changes button and close any setup windows that are left open.
Wrapping Up
Now that you have learned the basics of Windows 11, you are ready to use it. Just jump right in. If you want to study detailed information about Windows 11 and its applications, see the Microsoft Windows support site.
If you experience any issues with your system, contact the Help Desk using the following information:
- By phone at 202-555-5555 (local) or 866-555-5555 (toll-free).
- By email at HelpDesk@agency.gov.